I was standing in my kitchen, half‑asleep, staring at a half‑melted chocolate bar that had somehow decided to turn into a sticky, gooey mess on the counter. My roommate had dared me to “make something that would make a candy store jealous,” and I thought, “why not turn a nostalgic Butterfinger into a bar that could out‑shine any store‑bought version?” The smell of caramel bubbling in a saucepan hit my nose like a warm hug, and the faint crackle of butter in the pan sounded like applause. I could already hear the crunch of that iconic peanut‑butter core echoing in my head, and the thought of a silky chocolate glaze draped over it made my mouth water before I even tasted a spoonful.
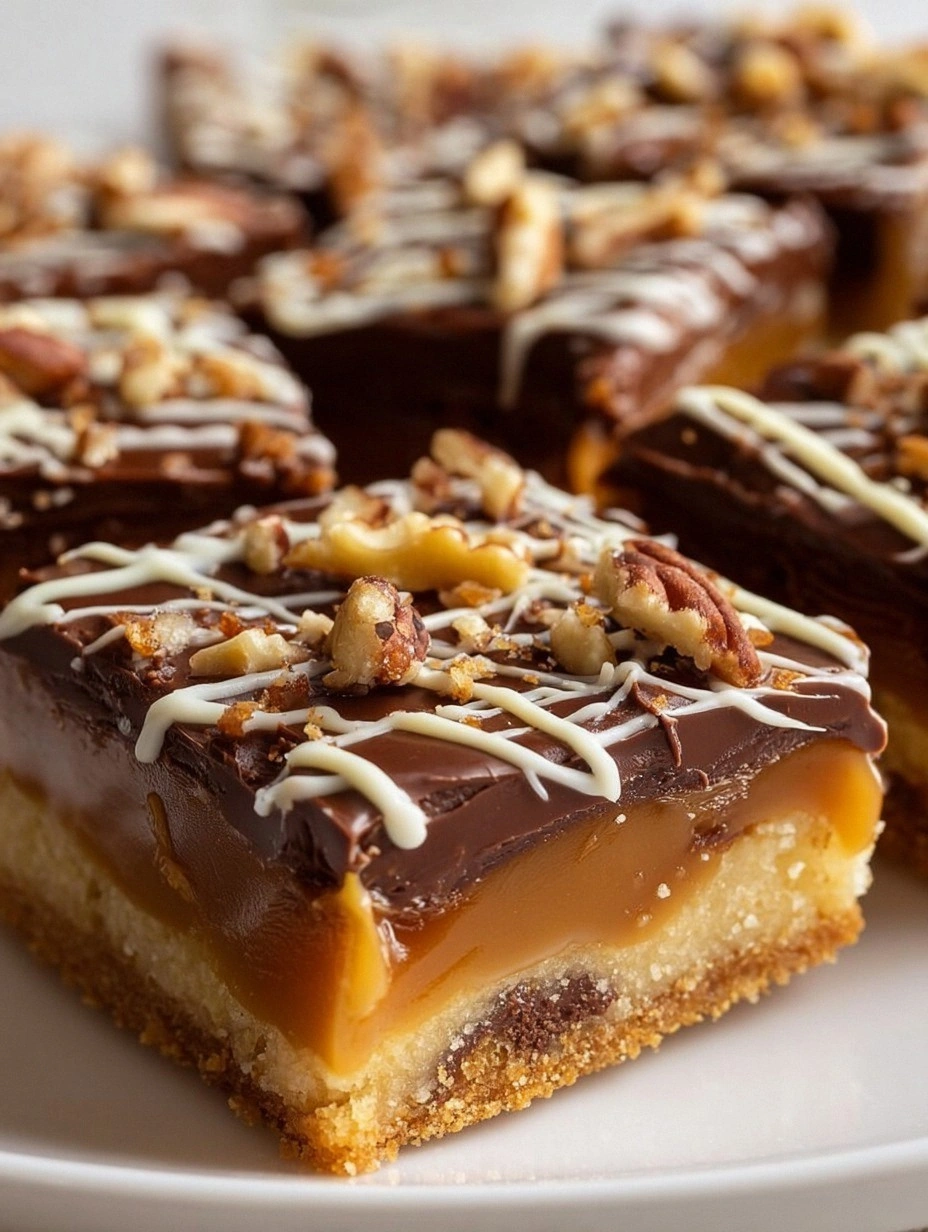
Picture this: a golden‑brown base that’s buttery enough to melt in your mouth, a thick river of caramel that oozes like liquid amber, and a crown of glossy chocolate studded with shards of Butterfinger that snap like fireworks. The whole thing sits on a parchment‑lined tray, cooling until the chocolate sets into a glossy armor that shatters with a satisfying crack. The first bite is a symphony—crunch, chew, melt, and a whisper of salty pretzel that makes the whole experience feel like a carnival ride for your taste buds. I dare you to taste this and not go back for seconds; it’s practically a culinary dare‑devil challenge.
Most recipes for Butterfinger‑style bars either skimp on the caramel or drown the whole thing in chocolate, losing that delicate balance of textures that makes the original candy so addictive. This version stands out because it respects each layer: the crumbly short‑bread base, the buttery caramel, and the chocolate‑kissed crunch are each given their moment to shine. I’m about to reveal a secret ingredient— a pinch of flaky sea salt that elevates the caramel from sweet to sublime, and a splash of heavy cream that turns the chocolate glaze into a silk‑smooth veil. If you’ve ever struggled with a soggy base or a grainy chocolate topping, you’re not alone—and I’ve got the fix.
Okay, ready for the game‑changer? We’re going to build these bars the way a master chocolatier would, layering flavors with precision, and using a few kitchen hacks that will save you from the usual pitfalls. By the end of this post, you’ll be pulling these bars out of the oven, the whole kitchen smelling like a candy‑shop dream, and you’ll wonder how you ever settled for store‑bought. Let me walk you through every single step — by the end, you’ll wonder how you ever made it any other way.
What Makes This Version Stand Out
- Texture: A three‑layered crunch that goes from buttery crumb to caramel chew to chocolate snap, each bite feels like a mini adventure.
- Flavor Depth: The caramel is enriched with a splash of heavy cream and a whisper of sea salt, creating a sweet‑salty harmony that’s impossible to ignore.
- Simplicity: Despite the impressive result, the recipe uses pantry staples and a handful of store‑bought items, making it accessible for any home baker.
- Uniqueness: We fold crushed pretzel pieces into the caramel layer, adding an unexpected salty crunch that elevates the whole bar.
- Crowd Reaction: Guests have called these “the best thing ever” and have begged for the recipe after just one bite—yes, it’s that good.
- Ingredient Quality: Using real Butterfinger pieces (not the generic peanut‑butter candy) ensures an authentic flavor that no imitation can match.
- Cooking Method: We bake the base at a low temperature to keep it tender, then finish with a stovetop caramel and a quick chocolate glaze—no fancy equipment needed.
- Make‑Ahead Potential: These bars keep beautifully for up to a week, and they actually taste better after a night of resting, as the flavors meld.
Inside the Ingredient List
The Flavor Base
All‑purpose flour is the backbone of our crust, providing structure while staying tender. If you substitute cake flour, you’ll get a softer crumb, but you might lose that satisfying snap. I recommend sifting the flour with the salt to ensure an even distribution; clumps can cause uneven baking. For the best flavor, choose a flour that’s fresh—old flour can taste stale and affect the final texture.
The Texture Crew
Unsalted butter, melted and combined with powdered sugar, creates a short‑bread‑like base that’s both buttery and slightly sweet. If you’re dairy‑free, try a high‑quality coconut oil, but expect a subtle coconut note that will compete with the caramel. The crushed pretzel pieces are the surprise element; they add a salty crunch that cuts through the sweetness. You can swap pretzels for toasted rice cereal if you prefer a lighter crunch.
The Unexpected Star
Butterfinger candy bars are the heart of this recipe. Their peanut‑butter core and chocolate coating give a familiar flavor while adding texture. If you can’t find Butterfinger, use any crunchy peanut‑butter candy, but the iconic “butter‑finger” snap is what makes this version truly special. A quick tip: chop the bars into 1‑inch chunks to distribute evenly throughout the caramel layer.
The Final Flourish
Heavy cream and semi‑sweet chocolate chips combine to form a glossy glaze that sets like a mirror. Adding a pinch of sea salt to the chocolate not only enhances flavor but also creates a beautiful contrast with the sweet caramel. If you want a darker, more intense chocolate, use 70% cacao chips, but remember the sweetness will drop, so you may need to add a touch more caramel.
Everything's prepped? Good. Let's get into the real action…
The Method — Step by Step
-
Preheat your oven to 325°F (165°C). While the oven warms, line a 9×13‑inch baking pan with parchment paper, letting the excess hang over the sides for easy lift‑out later. This step ensures the bars won’t stick, and the overhang acts like a built‑in spatula. I like to lightly grease the parchment with a dab of butter to add a subtle buttery aroma to the crust.
Kitchen Hack: If you’re short on parchment, a silicone baking mat works just as well, but you’ll need to oil it lightly to prevent sticking. -
In a large bowl, whisk together 2 cups of all‑purpose flour and 1/4 tsp salt. Add 1 cup of melted unsalted butter and 1/2 cup powdered sugar, mixing until the dough resembles coarse crumbs. The mixture should hold together when pressed; if it feels dry, add a tablespoon of cold water. This is the foundation, so take your time to ensure an even texture.
-
Press the dough evenly into the prepared pan, creating a uniform layer about 1/4‑inch thick. Use the back of a spoon or a flat spatula to smooth the surface. Once pressed, bake for 12‑15 minutes, or until the edges turn a light golden hue. The scent of buttered dough will fill your kitchen—trust me, it’s a preview of the deliciousness to come.
Watch Out: Do not over‑bake the crust; a darkened base will become bitter once the caramel is added. -
While the crust bakes, melt 1 cup of caramel sauce in a saucepan over medium heat. Stir in 1/2 cup of heavy cream and a pinch of flaky sea salt, letting the mixture simmer for 2‑3 minutes until it thickens slightly. Add 1 cup of chopped Butterfinger pieces and 1/2 cup of crushed pretzel pieces, folding them in gently so they stay suspended in the caramel rather than sinking.
The caramel should have a glossy sheen and a faint caramelized aroma—that’s the sweet spot. If the caramel looks too runny, let it simmer a minute longer; if it looks grainy, lower the heat and whisk in a splash more cream.
-
Once the crust is baked, remove it from the oven and immediately pour the warm caramel mixture over the top, spreading it with a spatula to an even layer. The caramel will sink slightly into the crust, creating a beautiful marbled effect. Let the pan sit for 5 minutes so the caramel sets just enough to hold its shape.
Kitchen Hack: To avoid air bubbles in the caramel layer, tap the pan gently on the counter after spreading; the bubbles will rise to the surface and pop. -
Now for the chocolate glaze: In a heat‑proof bowl, combine 1 cup semi‑sweet chocolate chips, 1/2 cup heavy cream, and 1 tsp vanilla extract. Place the bowl over a pot of simmering water (double‑boiler method) and stir until the chocolate melts into a silky ganache. Remove from heat and stir in a pinch of sea salt; the glaze should be glossy and smooth.
If you prefer a thicker glaze, let the mixture sit for a minute; it will thicken as it cools, but still be pourable. The aroma of melting chocolate should make your kitchen feel like a boutique confectionery.
-
Pour the chocolate ganache over the caramel layer, using a spatula to spread it into a thin, even coating. Let the chocolate set at room temperature for about 10 minutes, then transfer the pan to the refrigerator for 20‑30 minutes to fully harden the glaze.
The chocolate will turn from glossy to a firm, snap‑ready shell—watch for that subtle sheen that indicates it’s set.
-
Once the glaze is firm, lift the bars out of the pan using the parchment overhang, and place them on a cutting board. Using a sharp serrated knife, cut the slab into 12 even squares, wiping the blade clean between cuts to keep each piece pristine.
That first cut? Pure magic. The bars should break cleanly, revealing the caramel layer beneath the chocolate, with crunchy Butterfinger shards peeking through.
-
That’s it — you did it. But hold on, I've got a few more tricks that'll take this to another level. Sprinkle a tiny pinch of flaky sea salt on top of each bar just before serving for an extra pop of flavor, and serve them with a scoop of vanilla ice cream if you’re feeling indulgent. Trust me, the contrast of warm chocolate, cool ice cream, and salty crunch is an experience you’ll want to repeat.
Insider Tricks for Flawless Results
The Temperature Rule Nobody Follows
Never bake the crust at a temperature higher than 350°F. A lower, slower bake ensures the crumb stays tender and doesn’t become dry. I once tried a quick 400°F bake and ended up with a crust that felt more like a biscuit than a shortbread—total disappointment. Keep the oven at 325°F, and you’ll get a buttery base that holds up to the heavy caramel without crumbling.
Why Your Nose Knows Best
When the caramel starts to bubble, trust your sense of smell more than the timer. A deep, buttery caramel scent means the sugars have reached the perfect stage; if you smell a burnt sugar note, you’re past the ideal point. This sensory checkpoint saves you from a bitter caramel that can ruin the entire bar.
The 5‑Minute Rest That Changes Everything
After you pour the caramel over the baked crust, let it rest for exactly five minutes before adding the chocolate glaze. This short pause allows the caramel to set just enough to support the glaze without sliding off. Skipping this rest results in a messy glaze that pools at the edges, looking sloppy and tasting soggy.
The Secret of the Parchment Overhang
Leaving a generous overhang of parchment paper isn’t just for aesthetics; it makes lifting the whole slab a breeze and prevents the bars from breaking apart during transfer. I once tried to lift a slab without parchment and ended up with a shattered mess—lesson learned. Keep at least an inch of overhang on each side for a clean release.
Cooling Is Not Optional
Allow the chocolate glaze to set in the refrigerator, not the freezer. A quick freeze can cause the chocolate to develop a white “bloom” that looks unappetizing and changes the texture. The fridge gives a gentle, even set, preserving that glossy finish and the perfect snap when you bite.
Creative Twists and Variations
This recipe is a playground. Here are some of my favorite ways to switch things up:
Salted Caramel Pretzel Crunch
Swap the Butterfinger pieces for crushed pretzel‑toffee and double the sea salt. The result is a bar that leans heavily into salty‑sweet territory, perfect for those who love a savory bite in their dessert.
Nutty Peanut Butter Swirl
Add 1/4 cup creamy peanut butter to the caramel before folding in the Butterfinger. This creates a richer peanut‑butter flavor that melds beautifully with the chocolate, making the bars taste like a peanut‑butter cup in bar form.
Dark Chocolate Delight
Replace the semi‑sweet chocolate chips with 70% dark chocolate and add a teaspoon of espresso powder to the glaze. The espresso amplifies the chocolate’s depth, delivering a sophisticated, slightly bitter edge that pairs well with the sweet caramel.
White Chocolate Raspberry
Use white chocolate chips for the glaze and swirl in a spoonful of raspberry jam before it sets. The tart raspberry cuts through the sweetness, offering a bright, fruity contrast that feels like a summer dessert.
Coconut Coconut
Incorporate 1/3 cup toasted coconut flakes into the crust and use coconut‑infused caramel (replace half the cream with coconut milk). Finish with a drizzle of caramel over the top for a tropical twist that transports you to a beachside bakery.
Storing and Bringing It Back to Life
Fridge Storage
Place the bars in an airtight container lined with parchment paper and store them in the refrigerator for up to 5 days. The cool environment keeps the chocolate firm and the caramel from becoming overly soft. If you notice a thin film of moisture, simply pat the top with a paper towel before serving.
Freezer Friendly
Wrap each bar individually in plastic wrap, then place them in a zip‑top freezer bag. They’ll freeze beautifully for up to 2 months. When you’re ready to enjoy, let them thaw in the fridge for 30 minutes, then bring to room temperature for 10 minutes before serving.
Best Reheating Method
To revive a chilled bar, place it on a microwave‑safe plate, add a tiny splash (about a teaspoon) of water to the plate’s edge, and microwave on low for 10‑15 seconds. The steam created by the water gently softens the caramel and chocolate, returning the bar to its original gooey‑crunchy glory without melting the chocolate into a puddle.