I was standing in my kitchen, half‑asleep, clutching a half‑finished chocolate cake mix while a jar of cherry pie filling stared at me like a dare. My roommate had just challenged me: “Make something that’ll make me forget my name.” I laughed, but the idea of a cake that flips the script on the classic pineapple upside‑down version kept buzzing in my head. The oven’s hum, the faint crackle of butter hitting a hot pan, and the sweet‑tart perfume of cherries mingling with cocoa—those were the first notes of a symphony I didn’t even know I could conduct.
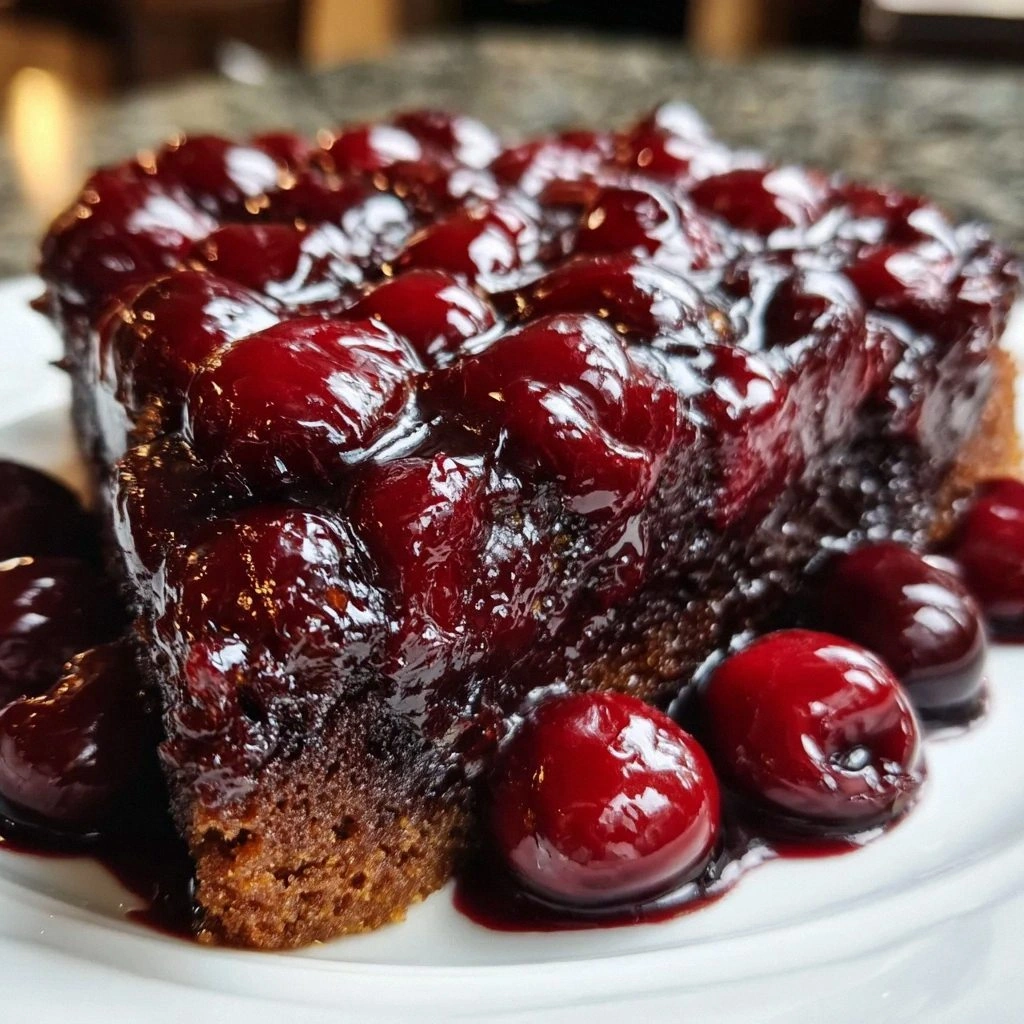
Picture this: the moment you pull the pan from the oven, the caramelized brown sugar glistens like a molten amber lake, the cherries bob up and down like tiny boats, and the chocolate cake rises, fluffy as a cloud that’s been kissed by midnight. The scent alone is a time‑travel machine—one whiff and you’re back to that first bite of a cherry‑filled pastry at a summer fair, but with a grown‑up twist that says, “I’m sophisticated, yet I still love fun.” I can already hear the collective gasp as the cake is flipped, revealing a glossy, ruby‑red top that looks almost too beautiful to eat. Trust me, I dare you to taste this and not go back for seconds.
Most upside‑down cakes get the topping right but forget the base, ending up soggy or bland. This version? Hands down the best you’ll ever make at home because the chocolate cake mix gives it that rich, velvety crumb while the cherry pie filling adds a burst of tang that cuts through the sweetness like a perfectly timed punchline. And the secret? A splash of vanilla that ties everything together, plus a tiny trick with the butter that creates a caramelized crust you’ll swear was made by a pastry chef. Most recipes get this completely wrong. Here’s what actually works.
I’ll be honest — I ate half the batch before anyone else got to try it, and that’s a confession I’m willing to own because the flavor is that good. The technique I’m about to reveal is simple, but it feels like sorcery when you see the final result. Okay, ready for the game‑changer? Let me walk you through every single step — by the end, you’ll wonder how you ever made it any other way.
What Makes This Version Stand Out
- Taste: The marriage of deep chocolate with bright cherry creates a contrast that dances on the palate, like a jazz duo that never misses a beat.
- Texture: A buttery, caramelized base gives a crisp edge, while the interior stays moist and airy, offering a dual‑mouthfeel that’s rare in upside‑down cakes.
- Simplicity: Using a store‑bought chocolate cake mix cuts prep time in half without sacrificing that homemade decadence.
- Uniqueness: Cherry pie filling replaces the usual pineapple, delivering a tangy pop that feels fresh yet comfortingly familiar.
- Crowd Reaction: Guests often claim it’s “the best dessert they’ve ever had,” and you’ll hear that line echoing around the table.
- Ingredient Quality: The recipe leans on high‑quality butter and real cherry filling, because shortcuts in flavor are unforgivable.
- Cooking Method: The upside‑down technique ensures the caramel never burns, while the cake bakes evenly thanks to the mix’s built‑in leavening.
- Make‑Ahead Potential: This cake keeps beautifully in the fridge for two days, and reheats like a dream, so you can prep ahead for parties.
Inside the Ingredient List
The Flavor Base
Cherry Pie Filling is the star of the show. This sweet and tangy cherry filling provides that burst of flavor that pairs beautifully with chocolate. If you skip it, you’ll lose the juicy contrast that makes every bite exciting. You can swap it for a high‑quality preserves or even fresh cherries cooked down with a splash of sugar, but the texture will change. Pro tip: Look for a filling with real fruit chunks, not just syrup.
The Texture Crew
Unsalted Butter, melted, brings richness and moisture to the cake. It’s essential for creating that buttery brown sugar layer that caramelizes perfectly. If you use salted butter, you’ll end up with an unintended salty punch that throws off the balance. Brown Sugar adds a hint of caramel flavor and keeps the cake moist; its molasses content is what gives the topping that deep amber hue. Skipping brown sugar for white sugar will result in a flat, pale crust that looks sad.
The Unexpected Star
Chocolate Cake Mix simplifies the process while ensuring your cake remains fluffy and decadent. No need to fuss over exact ratios here; the mix already contains the right leaveners. Large Eggs bind everything together, add richness, and contribute to the cake’s structure. If you substitute with egg whites only, the cake will be airy but lack that buttery depth.
The Final Flourish
Vegetable Oil keeps the cake moist and tender, and it blends seamlessly with the butter without adding any extra flavor that could compete with the cherries. Water hydrates the dry ingredients, creating a batter that spreads evenly. Vanilla Extract, just a teaspoon, adds warmth and depth, tying all the flavors together in perfect harmony. If you run out of vanilla, a splash of almond extract works, but it will shift the flavor profile toward nutty.
Everything's prepped? Good. Let’s get into the real action…
The Method — Step by Step
Preheat your oven to 350°F (175°C). While the oven warms, melt the unsalted butter in a small saucepan over low heat. Once it’s fully liquid, add the brown sugar and stir until it dissolves into a smooth, glossy mixture. You’ll know it’s ready when the sugar stops clumping and the mixture looks like a dark amber river. Watch the color closely—if it starts to darken too much, remove it from heat immediately.
Pour the caramel into a 9‑inch round cake pan, spreading it evenly across the bottom. Quickly spoon the cherry pie filling over the caramel, arranging the cherries in a single layer so each bite gets a juicy pop. Press them down gently with the back of a spoon—this prevents them from floating up during baking.
In a large mixing bowl, combine the chocolate cake mix, eggs, vegetable oil, water, and vanilla extract. Beat on medium speed for about 2 minutes, just until the batter is smooth and glossy. Over‑mixing can make the cake tough, so stop as soon as you see a uniform texture. The batter should look thick but pourable, like a decadent chocolate mousse.
Now comes the fun part: gently pour the batter over the cherries, letting it flow around them. Use a spatula to smooth the top, but avoid stirring the cherries back up. The batter will settle like a chocolate blanket, tucking the cherries in for a perfect bake. That sizzle when it hits the pan? Absolute perfection.
Slide the pan into the preheated oven and bake for 30‑35 minutes. The cake is done when a toothpick inserted into the center comes out clean, and the edges start pulling away from the pan, revealing a golden‑brown crust. The aroma at this stage is intoxicating—think chocolatey clouds with a whisper of cherry.
While the cake bakes, prepare a cooling rack. As soon as the timer dings, remove the pan and place it on the rack for 5 minutes. This short rest lets the caramel set just enough to prevent a soggy bottom but remains soft enough for a clean flip.
Now, the moment of truth: place a large serving plate upside‑down over the pan and, with a confident flick, flip the cake. The cherries should now crown the top, glistening in their caramel‑chocolate glaze. If any cherries stick, a quick tap on the bottom of the pan will release them.
Allow the cake to cool for another 10 minutes before slicing. This waiting period lets the flavors meld, and the caramel thickens just enough to coat each slice like a glossy mirror. Serve warm with a dollop of whipped cream or a scoop of vanilla ice cream, and watch your guests’ eyes widen in pure delight.
That’s it — you did it. But hold on, I’ve got a few more tricks that’ll take this to another level…
Insider Tricks for Flawless Results
The Temperature Rule Nobody Follows
Never bake an upside‑down cake straight from a cold fridge. Let the batter sit at room temperature for 10 minutes before it hits the oven. This subtle warmth ensures the caramel doesn’t seize up and the cake rises evenly. A friend once tried skipping this step and ended up with a dense, gummy center—trust me, the extra minutes are worth it.
Why Your Nose Knows Best
Your sense of smell is a more reliable indicator of doneness than a timer. When the caramel starts to emit a nutty, toasted aroma and the chocolate cake edges turn a deep mahogany, you’re almost there. If you rely solely on the clock, you risk over‑baking, which can make the caramel turn bitter.
The 5‑Minute Rest That Changes Everything
After flipping, let the cake rest on the plate for five minutes before cutting. This short pause lets the caramel settle into the cake’s pores, preventing it from oozing out onto the plate. I once sliced too early and the caramel ran like lava, turning a beautiful presentation into a sticky mess.
The “Don’t Touch” Zone
Resist the urge to poke at the cake while it’s baking. Opening the oven door too often drops the temperature, causing the cake to sink in the center. Trust the timer, and if you need to check, do it quickly and close the door firmly.
The Ice‑Cold Plate Trick
If you want a dramatic, glossy finish, chill the serving plate in the freezer for 10 minutes before flipping. The sudden temperature contrast gives the caramel a thin, glass‑like sheen that makes the cake look restaurant‑ready. Just be careful not to let the plate get too frosty, or the caramel might crack.
Creative Twists and Variations
This recipe is a playground. Here are some of my favorite ways to switch things up:
Mocha Madness
Add a tablespoon of instant coffee granules to the batter for a subtle mocha flavor that deepens the chocolate profile. Coffee lovers will adore the bitter‑sweet balance, and the cherries still shine through.
Nutty Crunch
Stir in half a cup of toasted chopped almonds or hazelnuts into the batter. The nuts add a pleasant crunch that contrasts the soft cake and juicy cherries, making each bite an adventure.
Spiced Cherry
Mix a pinch of ground cinnamon and a dash of ground ginger into the caramel before pouring it into the pan. The warm spices echo the cherry’s tartness and give the cake a cozy, autumn‑like feel.
White Chocolate Whisper
Swap half of the chocolate cake mix for a white chocolate cake mix. The lighter cake base lets the cherry’s ruby hue pop even more, and the flavor becomes a delicate dance between sweet and tart.
Berry Fusion
Replace half of the cherry filling with raspberry or blackberry jam. The mixed berries add a tangy complexity and a beautiful marbled look when the cake is flipped.
Storing and Bringing It Back to Life
Fridge Storage
Allow the cake to cool completely, then cover it loosely with foil or a reusable silicone lid. Store in the refrigerator for up to two days. The caramel will soften slightly, but the cake stays moist thanks to the butter and oil.
Freezer Friendly
Wrap the whole cake (or individual slices) tightly in plastic wrap, then place it in a freezer‑safe bag. It freezes beautifully for up to three months. When you’re ready to enjoy, thaw in the fridge overnight.
Best Reheating Method
Reheat slices in a preheated 300°F (150°C) oven for 8‑10 minutes. Add a tiny splash of water (about a teaspoon) to the pan before reheating; the steam revives the caramel’s gloss and keeps the cake from drying out. Serve warm for maximum indulgence.