Picture this: it’s a rainy Saturday, you’re curled up with a mug of hot cocoa, and suddenly the craving hits—something sweet, salty, and utterly addictive. I was rummaging through the pantry, half‑expecting to stumble upon a forgotten jar of caramel and a stash of peanuts, when the idea sparked: what if we could marry the gooey decadence of caramel with the crunchy, buttery crunch of peanuts, all wrapped in a glossy coat of chocolate? The result was a little bite‑size wonder that made my taste buds do a happy dance.
I didn’t just stop at the basic idea. I spent hours tweaking the ratios, experimenting with different chocolate grades, and testing the texture until the caramel didn’t stick to the bowl and the chocolate didn’t crack on the first bite. The final version is a symphony of textures—soft caramel that melts in your mouth, crunchy peanuts that add a satisfying snap, and a chocolate shell that’s glossy and slightly bittersweet, like a velvety midnight sky. Every bite is a layered experience that leaves you wondering why you ever settled for plain candy bars.
If you’ve ever tried a homemade caramel chocolate treat that turned out too sweet or too dry, you know the frustration. That’s why I’m obsessed with sharing this version: it’s the perfect balance of sweet, salty, and chocolatey, with a buttery finish that keeps you coming back for more. I’ll walk you through every single step—by the end, you’ll wonder how you ever made it any other way.
And here’s a little secret: the key to that irresistible crunch isn’t just the peanuts. It’s the way we toast them just enough to release their oils, and the precise temperature we melt the chocolate. Trust me, I’ll show you how to get that perfect snap without any of the usual pitfalls. Ready? Let’s dive in.
What Makes This Version Stand Out
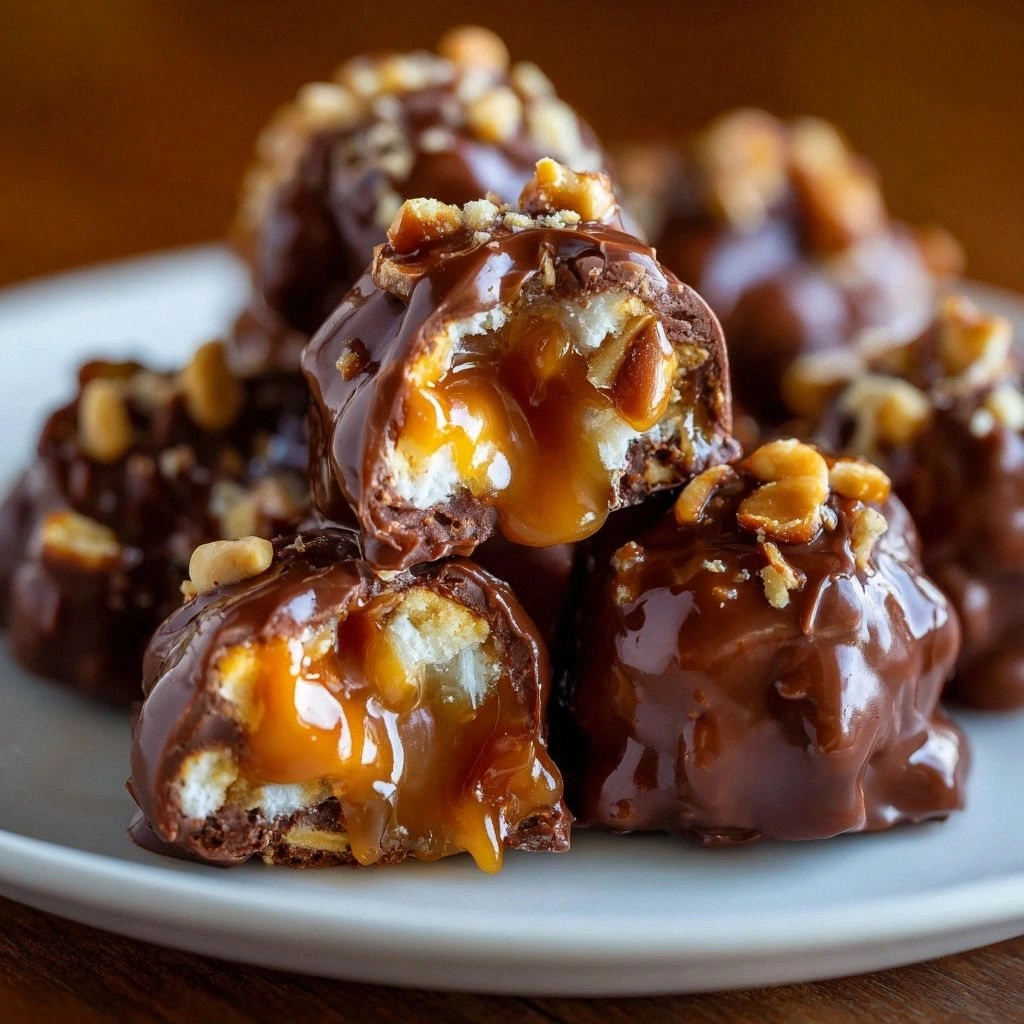
- Flavor Depth: The caramel isn’t just sweet; it carries a caramelized sugar nuance that pairs beautifully with the bittersweet dark chocolate. The result is a layered flavor profile that feels both indulgent and sophisticated.
- Texture Play: Crunchy roasted peanuts meet silky caramel, all encased in a glossy chocolate shell that snaps just enough to give a satisfying sound—like a tiny celebration in your mouth.
- Simple Prep: No advanced equipment. All you need is a saucepan, a double boiler or microwave, and a silicone mat. It’s the kind of recipe that feels like a gourmet treat but is actually a weekend kitchen win.
- Ingredient Quality: We use high‑quality dark chocolate (70% cacao) and a store‑bought caramel that’s smooth, not gritty. The difference is like comparing a fine wine to a cheap soda.
- Crowd‑Pleaser: Whether you’re hosting a game night or a quiet Sunday brunch, these clusters become the talk of the table. They’re bite‑sized, easy to share, and look like they’ve come from a fancy confectionery.
- Make‑Ahead Friendly: The clusters can be stored at room temperature for up to a week, or frozen for months, making them an excellent prep‑ahead snack.
Alright, let's break down exactly what goes into this masterpiece…
Inside the Ingredient List
The Flavor Base
Caramel sauce is the heart of this recipe. It’s not just about sweetness; it’s about the depth that comes from the Maillard reaction when sugar caramelizes. If you use a low‑quality caramel, you’ll end up with a flat, syrupy taste. That’s why I recommend a high‑quality store‑bought caramel or a homemade version with a touch of sea salt.
Peanut butter adds body and a nutty undertone that balances the caramel’s sweetness. A smooth peanut butter keeps the mixture silky, while a chunky variety adds a rustic texture. If you’re allergic, you can replace it with almond butter for a slightly different profile.
The Texture Crew
Roasted peanuts are the crunch factor. Toast them lightly in a dry skillet until they’re fragrant—about 3–4 minutes. This step releases the oils, giving the peanuts a richer flavor and preventing them from feeling raw. Skipping this step will leave you with a flat, less satisfying bite.
Dark chocolate chips are the outer shell. I use 70% cacao because it provides a robust chocolate flavor without being overly bitter. If you prefer a sweeter finish, you can switch to semi‑sweet chocolate, but the balance will shift.
The Unexpected Star
Sea salt is the secret weapon. A pinch of sea salt elevates the caramel’s sweetness and brings out the chocolate’s depth. Think of it as the final seasoning that turns an ordinary dessert into a gourmet experience.
The Final Flourish
Vanilla extract gives a subtle aroma that ties all the flavors together. A teaspoon is enough to lift the overall profile. Butter is optional but recommended; it adds a silky mouthfeel and helps the chocolate coat the clusters evenly.
Everything's prepped? Good. Let's get into the real action…
The Method — Step by Step
- Toast the Peanuts: Heat a dry skillet over medium heat. Add the peanuts and stir frequently for 3–4 minutes until they’re golden and fragrant. The aroma should be nutty, almost buttery. Once done, transfer them to a bowl and let them cool slightly. This step is crucial; if you skip it, the peanuts will taste raw and the clusters will lack that satisfying crunch.
- Heat the Caramel: In a saucepan, pour the caramel sauce and add a tablespoon of butter if you’re using it. Warm over low heat, stirring constantly, until the mixture is smooth and glossy. You should see tiny bubbles forming—this indicates the caramel is ready. If it starts to thicken too much, add a splash of milk to loosen it.
- Combine Peanut Butter: Remove the saucepan from heat and stir in the peanut butter until the mixture is homogeneous. The peanut butter should melt into the caramel, creating a thick, creamy base. The consistency should be thick enough to coat a spoon but still pourable.
- Add Vanilla and Salt: Stir in the vanilla extract and sea salt. The salt should dissolve completely; you’ll notice a bright, almost metallic sheen on the surface. This is the moment when the flavors start to marry.
- Fold in Peanuts: Gently fold the toasted peanuts into the caramel‑peanut butter mixture. Ensure each peanut is coated; this prevents uneven sweetness and crunch.
- Shape the Clusters: Drop spoonfuls of the mixture onto a silicone mat or parchment paper. Use a small cookie scoop or spoon to form uniform balls, about 1.5 inches in diameter. Let them sit for 5 minutes so they firm up slightly.
- Melt the Chocolate: While the clusters are setting, melt the dark chocolate chips. Use a double boiler or microwave: 30 seconds on, stir, repeat until smooth. The chocolate should be glossy and pourable but not overheated.
- Coat the Clusters: Dip each cluster into the melted chocolate, ensuring it’s fully coated. Tap gently to let excess chocolate drip off. Place them back on the silicone mat to set. This step is the moment of truth—if you rush, the chocolate may not set properly.
- Let Set: Allow the chocolate to harden at room temperature for about 15 minutes. The clusters should feel firm to the touch. If you’re in a hurry, a quick chill in the fridge for 5 minutes will do the trick.
- Finish and Store: Once the chocolate is set, you can optionally dust the clusters with a pinch of sea salt or cocoa powder for extra flair. Store them in an airtight container at room temperature for up to a week, or freeze for longer storage.
That's it — you did it. But hold on, I've got a few more tricks that'll take this to another level…
Insider Tricks for Flawless Results
The Temperature Rule Nobody Follows
Chocolate is temperamental. The secret is to keep it below 86°F (30°C) until it’s fully melted, then let it cool to 86–88°F (30–31°C) before coating the clusters. This ensures a glossy finish without the dreaded white film. I use a kitchen thermometer to keep it precise—trust me, the difference is visible.
Why Your Nose Knows Best
Before you start, give the caramel a sniff. If it smells like toasted sugar with a hint of buttery richness, it’s ready. A sharp, burnt smell means you’ve gone too far. Your nose is a reliable guide; use it like a seasoned sommelier would with wine.
The 5-Minute Rest That Changes Everything
After dipping the clusters, let them rest on the silicone mat for 5 minutes. This brief pause allows the chocolate to set evenly and the caramel to firm up slightly, preventing the chocolate from sliding off. It’s a small step that dramatically improves texture.
Use a Silicone Mat for Easy Release
Silicone mats keep the clusters from sticking, making the process cleaner. If you’re using parchment paper, lightly spray it with non‑stick cooking spray to avoid the clusters clinging. A quick swipe with a spatula will free them without breaking the chocolate shell.
Add a Splash of Water for Reheating
If the clusters have been frozen, a tiny splash of water on the chocolate before reheating will create steam that re‑softens the chocolate without melting the caramel core. This trick keeps the texture intact and the flavor profile unchanged.
Creative Twists and Variations
This recipe is a playground. Here are some of my favorite ways to switch things up:
Spiced Caramel Peanut
Add a pinch of cayenne pepper or smoked paprika to the caramel mixture for a subtle heat that contrasts the sweetness. The peppery undertone adds depth and makes the clusters a conversation starter.
Almond Joy Version
Swap peanuts for toasted almonds and use coconut flakes in place of some of the caramel. The result is a tropical, chewy treat that’s perfect for summer gatherings.
Nut-Free Caramel Cluster
Use sunflower seeds or pumpkin seeds instead of peanuts. The seeds provide a similar crunch, and the caramel remains the star of the show.
White Chocolate & Mint
Replace dark chocolate with white chocolate and add a few drops of peppermint extract. The mint gives a refreshing lift, ideal for holiday parties.
Cocoa Dusted Surprise
After the chocolate has set, dust the clusters with a light coating of cocoa powder. The slight bitterness balances the caramel’s sweetness, creating a more complex flavor profile.
Storing and Bringing It Back to Life
Fridge Storage
Store the clusters in an airtight container at room temperature for up to 7 days. If you notice the chocolate softening slightly, let them sit at room temperature for a few minutes before serving.
Freezer Friendly
For longer storage, wrap each cluster in parchment paper and place them in a freezer bag. They’ll stay fresh for up to 3 months. When ready to eat, let them thaw at room temperature for 10 minutes.
Best Reheating Method
To revive frozen clusters, place them in a microwave-safe bowl and heat on 30% power for 10–15 seconds. A tiny splash of water before heating creates steam that gently softens the chocolate without melting the caramel core.