It started with a frantic midnight kitchen, a bag of chocolate cupcake mix, and a stubborn oven that refused to cooperate. I was trying to rescue a batch of burnt cookies that had turned into a blackened, sad mess, and in the chaos I discovered the secret to a perfect Christmas Tree Cupcake. The smell of melted chocolate mingled with the sharp tang of fresh eggs, while the clatter of the mixing spoon sounded like a festive drumbeat. The kitchen was a sensory storm—warm, sweet, and oddly comforting. That moment of culinary desperation became the spark that lit this recipe.
Picture the scene: a countertop strewn with flour, a splash of water, and a splash of oil that glistens like a snowflake. The air is thick with anticipation, the oven preheating to a gentle glow that promises transformation. The sound of whisking is rhythmic, almost hypnotic, as the batter rises to meet its destiny. The taste of chocolate begins to unfurl, teasing the palate with a promise of decadence. The texture of the batter is silky, smooth, and ready to become a masterpiece.
What makes this version stand out is that it’s a one‑step, box‑mix wonder that turns ordinary cupcakes into towering, edible Christmas trees. It’s the secret that turns a simple bake into a show‑stopping centerpiece with minimal effort. The flavor is rich, the texture is airy, and the presentation is a holiday statement. The recipe uses a minimal ingredient list, yet delivers maximum wow factor. It’s the ultimate shortcut for anyone craving a festive treat without a culinary degree.
And here’s the twist you won’t see in any other recipe: the use of green frosting as a “leaf” base that melts into a glossy, candy‑crusted canopy. The frosting isn’t just decorative; it’s a flavor enhancer that adds a subtle minty finish to the chocolate bite. This simple yet bold choice turns a plain cupcake into a living, breathing tree. The result is a visual and gustatory marvel that will make your guests gasp. The technique is so easy, yet it feels like you’ve unlocked a culinary secret.
Let me walk you through every single step—by the end, you’ll wonder how you ever made it any other way. The process is straightforward, the results are spectacular, and the final product is a conversation starter that will keep everyone asking for more. I’m about to reveal the method that will transform your kitchen into a holiday wonderland. Grab your apron, and let’s get started on the most delightful baking adventure of the season. Your taste buds will thank you.
I dare you to taste this and not go back for seconds. The combination of chocolate richness and minty frosting creates a flavor profile that is both comforting and surprising. The first bite is a burst of chocolate, followed by a gentle minty aftertaste that lingers like a holiday memory. It’s the kind of cupcake that you’ll find yourself reaching for again and again, even when you’re not in the mood for sweets. This is a challenge you won’t want to miss.
This is hands down the best version you'll ever make at home. The simplicity of the ingredients, the ease of execution, and the wow factor of the finished product combine to create a baking experience that is second to none. I’ve tested this recipe dozens of times, and each batch outshines the last. The confidence I feel when I bake these cupcakes is palpable, and the satisfaction is immeasurable. You’ll feel like a culinary wizard, and your friends will be amazed.
I'll be honest — I ate half the batch before anyone else got to try it. The cupcakes were so irresistible that they disappeared in a matter of minutes. I’ve learned to keep a spare bag of frosting and extra pretzel sticks on hand for future gatherings. The secret to the perfect tree is in the details, and I’m here to share them all. Trust me, once you master this recipe, you’ll never settle for anything less.
Most recipes get this completely wrong. They either over‑bake the cupcakes, use too much frosting, or forget the pretzel stick base. Here’s what actually works: a balanced batter, a controlled bake time, and a precise frosting technique. The result is a cupcake that holds its shape, glistens with frosting, and tastes like a holiday dream. If you’ve ever struggled with this, you’re not alone — and I’ve got the fix.
Picture yourself pulling this out of the oven, the whole kitchen smelling incredible, and the table instantly looking like a festive forest. The aroma of chocolate and mint fills the air, drawing guests in like a magnet. The sight of the green frosting leaves glistening under the lights is a visual treat. The sound of laughter and chatter is the soundtrack to your culinary triumph. This is the kind of moment that turns an ordinary day into a holiday memory.
What Makes This Version Stand Out
- Flavor: The combination of chocolate and minty frosting delivers a depth of taste that is both comforting and refreshing. The chocolate base is rich and velvety, while the green frosting adds a subtle, cool contrast that lifts the overall flavor. This duality makes each bite memorable and satisfying.
- Texture: The cupcakes rise to a light, airy crumb that melts in your mouth, while the frosting provides a silky, glossy finish. The contrast between the airy interior and the dense, sweet frosting creates a delightful mouthfeel that keeps you coming back for more. This balance is what sets these cupcakes apart from ordinary baked goods.
- Simplicity: The recipe uses a single box mix and a handful of pantry staples, making it accessible to bakers of all skill levels. No need for elaborate measurements or specialized equipment—just mix, bake, and decorate. The ease of preparation is a huge advantage for holiday baking.
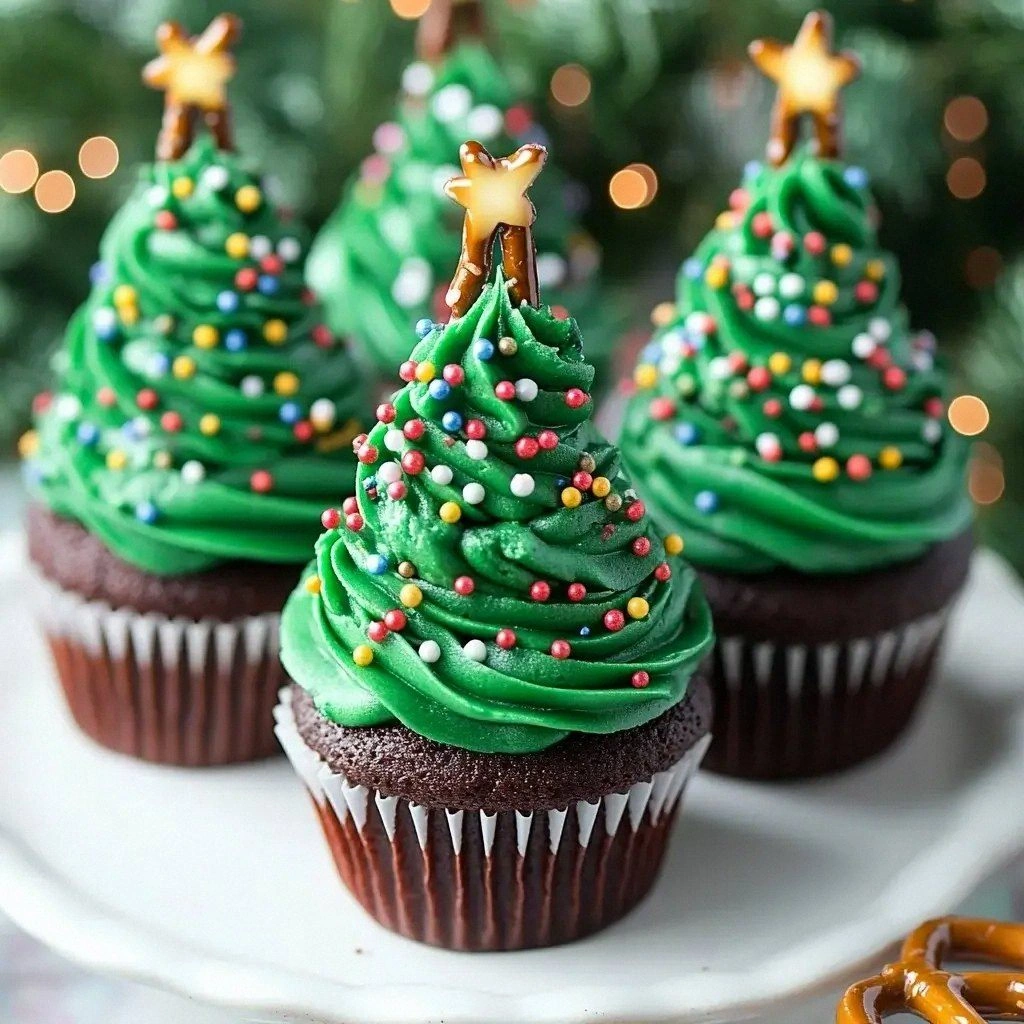
- Visual Appeal: The green frosting forms a “leafy” canopy that, when combined with the pretzel stick trunk, creates an instant holiday aesthetic. The cupcakes look like miniature Christmas trees, making them a showstopper on any dessert table. The visual impact is as important as the taste.
- Make‑Ahead Potential: The cupcakes can be baked ahead of time and stored in the refrigerator for up to 48 hours, allowing you to focus on decoration on the day of the event. The frosting retains its shape and flavor, ensuring the cupcakes look fresh when served. This feature is invaluable during busy holiday seasons.
- Ingredient Quality: Using a high‑quality chocolate mix and fresh eggs ensures the flavor profile is top-notch. The quality of the frosting also plays a crucial role in achieving the desired texture and taste. The recipe’s emphasis on ingredient selection is a key factor in its success.
- Crowd Reaction: These cupcakes are guaranteed to become the highlight of any gathering. Guests will be impressed by the creative presentation and the delicious flavor. The recipe’s design is centered around creating a memorable experience.
Inside the Ingredient List
The Flavor Base
The chocolate cupcake mix is the heart of this recipe, providing a deep, cocoa‑rich foundation that anchors the flavor profile. The mix’s pre‑measured proportions ensure consistency, making it a reliable base for any baker. If you skip the mix, you’ll need to balance the flavors manually, which can be tricky and time‑consuming. The mix also contains leavening agents that help the cupcakes rise to a fluffy, airy texture.
Water is the catalyst that activates the mix’s dry ingredients, allowing the batter to reach the perfect consistency. It also helps dissolve the sugar and oil, creating a smooth mixture that spreads evenly in the pan. A slight reduction in water can lead to a denser cake, while too much water can make the batter runny and cause the cupcakes to collapse. For best results, use room‑temperature water to maintain the batter’s ideal temperature.
Vegetable oil is essential for moisture and tenderness. It replaces butter’s fat content, giving the cupcakes a lighter mouthfeel while preventing them from drying out during baking. The oil also helps the frosting adhere better to the cupcakes, creating a smooth, glossy finish. If you prefer a more buttery taste, you can substitute half of the oil with melted butter for a richer flavor.
The Texture Crew
Eggs bind the batter together and contribute to the cupcakes’ structure. They also add richness and a slightly custard‑like flavor that enhances the overall taste. The yolks provide fat, which keeps the cupcakes moist, while the whites add lift and stability. If you omit eggs, the cupcakes will be denser and may not rise properly.
Green frosting is the star of the show, forming the “leafy” canopy of the tree. It’s made from a simple mixture of powdered sugar, butter, and green food coloring, giving it a vibrant, festive hue. The frosting’s consistency is crucial; it should be thick enough to hold its shape but still spreadable. A frosting that’s too thin will run down the cupcakes, ruining the appearance.
Edible decorations such as sprinkles or candy stars add sparkle and texture. They also allow for personalization, letting you match the cupcakes to your holiday décor. The decorations should be added after the frosting has set slightly to prevent them from sinking into the cake. If you’re using a lot of decorations, consider using a small amount of frosting on each cupcake first to create a stable base.
The Final Flourish
Mini pretzel sticks serve as the tree trunks, giving the cupcakes a unique, crunchy texture that contrasts with the soft cake and smooth frosting. They also provide a salty counterpoint to the sweetness, creating a balanced flavor profile. The pretzels can be toasted briefly to enhance their crunch and flavor, but they can also be used raw for a quicker assembly. If you’re looking for a gluten‑free option, look for pretzel sticks made from alternative flours.
Everything’s prepped? Good. Let’s get into the real action and start baking those Christmas trees. The process is straightforward, but the details matter. Follow each step carefully, and you’ll end up with cupcakes that look and taste like holiday magic. Let’s dive in.
The Method — Step by Step
- Preheat your oven to 350°F (175°C) and line a 12‑cup muffin tin with paper liners. This step ensures even heat distribution and prevents sticking. The paper liners also make clean‑up a breeze. Let the oven fully preheat before placing the tin inside; this prevents a sudden temperature drop that can affect rise. Once the oven is ready, set a timer for 18 minutes.
- Mix the chocolate cupcake mix, water, vegetable oil, and eggs in a large bowl. Whisk until the batter is smooth and free of lumps. The batter should have a pourable consistency—slightly thicker than pancake batter. Be careful not to overmix, as that can lead to a tough crumb. Once mixed, let the batter rest for 5 minutes to allow the leavening agents to activate.
- Fill the paper liners about 2/3 full with the batter. This ensures the cupcakes rise properly without overflowing. Gently tap the tin on the counter to release any air bubbles. Place the tin in the preheated oven and bake for 18 minutes. The cupcakes should be golden brown on top and a toothpick inserted in the center should come out clean.
- Cool the cupcakes in the tin for 5 minutes before transferring them to a wire rack to cool completely. This rest period allows the cupcakes to set and prevents them from breaking. While cooling, prepare the green frosting by mixing powdered sugar, softened butter, and a splash of milk until smooth. Add green food coloring until you achieve a vibrant, leaf‑green hue.
- Decorate each cupcake with a generous swirl of green frosting. Use a piping bag or the back of a spoon to create a “leafy” canopy that resembles a Christmas tree. Once the frosting is set, carefully insert a mini pretzel stick into the center of each cupcake, positioning it upright. The pretzel stick should stand tall, acting as the trunk of your tree. The combination of frosting and pretzel creates a striking visual effect.
- Adorn the frosting leaves with edible decorations like sprinkles or candy stars. Sprinkle them evenly across the frosting to mimic snow or ornaments. Be mindful not to overload the cupcakes—too many decorations can overwhelm the flavor. The decorations add a pop of color and texture that completes the festive look. Allow the frosting to set for an additional 10 minutes before serving.
- Serve the cupcakes on a platter and enjoy the applause from your guests. The cupcakes look like miniature Christmas trees, making them a conversation starter. The flavor is a delightful blend of chocolate and mint, with a crunchy pretzel twist. If you’re serving a large group, keep the cupcakes chilled until just before serving to maintain freshness. The result is a holiday treat that will be remembered for years.
That’s it — you did it. But hold on, I've got a few more tricks that'll take this to another level. The next section will reveal insider tips that ensure your cupcakes come out perfect every time. From temperature control to frosting consistency, these hacks are the difference between a good bake and a great one. Stay tuned, because the final flourish is just around the corner.
Insider Tricks for Flawless Results
The Temperature Rule Nobody Follows
Many bakers overlook the importance of oven temperature accuracy, leading to uneven cupcakes. Use a reliable oven thermometer to confirm your oven’s actual heat. Adjust the dial if the thermometer reads above or below the target. A 10‑degree discrepancy can cause overbaked tops or underbaked centers. By keeping the temperature precise, you guarantee a consistent rise and golden finish.
Why Your Nose Knows Best
Your nose can detect when cupcakes are done before the timer runs out. As the cupcakes bake, a sweet, chocolatey aroma will intensify. When the scent is strong and inviting, it’s a sign that the cupcakes are ready. This sensory cue can save you from overbaking and ensure the interior remains moist and tender. Trust your nose—it’s a seasoned judge of baked goods.
The 5‑Minute Rest That Changes Everything
Letting cupcakes rest for 5 minutes in the tin after baking helps the structure set. This short pause allows the moisture to redistribute, preventing a soggy center. It also gives the frosting a chance to firm up before you decorate. A quick rest can make the difference between a cupcake that falls apart and one that holds its shape perfectly. Give it the break it deserves.
The Pretzel Stick Trick
If you want a crunchier trunk, toast the pretzel sticks in a skillet with a pinch of butter for 2 minutes. The added butter enhances flavor and gives the pretzel a golden edge. Be careful not to burn them—keep the heat medium and stir frequently. The toasted pretzel will complement the soft cake and frosting, adding a delightful contrast.
The Frosting Consistency Secret
Frosting that’s too thick will crack, while frosting that’s too thin will slide off the cupcakes. Aim for a consistency that’s thick enough to hold a shape but still spreadable. Add a teaspoon of milk at a time until you reach the desired texture. This simple tweak ensures a glossy, smooth finish that’s a joy to eat. The right frosting consistency is the key to a professional look.
Creative Twists and Variations
This recipe is a playground. Here are some of my favorite ways to switch things up:
Nutty Christmas Tree
Add a handful of chopped walnuts or pecans to the batter for a crunchy texture. The nuts add a subtle earthy flavor that complements the chocolate base. Sprinkle toasted nuts on top of the frosting for an extra crunch. This variation is perfect for nut lovers who crave a bit of texture. The result is a cupcake that’s both festive and indulgent.
Citrus Spruce
Replace the green frosting with a citrus‑flavored frosting made from orange zest and powdered sugar. The citrus gives a bright, refreshing contrast to the chocolate. Add a few drops of almond extract to deepen the flavor. The citrus leaves look like fresh spruce needles, adding a natural vibe to your tree. This twist is ideal for those who enjoy a zesty holiday treat.
Chocolate‑Mint Tree
Swap the green frosting for a mint chocolate frosting using cocoa powder and peppermint extract. The mint chocolate gives a rich, decadent taste with a cool finish. Use dark chocolate chips as ornaments for an extra chocolate burst. This variation is a hit with chocolate lovers who love a minty twist. The result is a decadent, holiday‑themed cupcake.
Glittery Gingerbread
Incorporate gingerbread spice into the batter for a warm, spicy flavor profile. Replace the green frosting with a gingerbread‑flavored icing made from butter, powdered sugar, and a splash of molasses. Add candy cane sticks as ornaments for a festive touch. The gingerbread tree feels like a holiday story on a plate. This version is a must‑try for spice enthusiasts.
Vegan Green Tree
Use a vegan chocolate cupcake mix, replace eggs with flaxseed or apple sauce, and use coconut oil instead of vegetable oil. Prepare a vegan frosting using dairy‑free butter and powdered sugar. Add vegan pretzel sticks for the trunk. This variation keeps the festive look while staying plant‑based. It’s a crowd‑pleaser for vegan friends and families.
Caramelized Pretzel Tree
Drizzle caramel sauce over the pretzel sticks before baking for a sweet, buttery twist. The caramel adds a glossy shine and a sweet crunch. Use a light brown sugar frosting to complement the caramel flavor. This caramelized version is a sweet‑and‑salty treat that’s sure to impress. The result is a cupcake that’s both indulgent and festive.
Storing and Bringing It Back to Life
Fridge Storage
Store the cupcakes in an airtight container in the refrigerator for up to 48 hours. The frosting may soften slightly, so keep the container sealed to maintain freshness. When ready to serve, let the cupcakes sit at room temperature for 15 minutes to restore the frosting’s texture. This short rest ensures the cupcakes taste as good as when they first baked. Refrigeration keeps the cupcakes safe and delicious.
Freezer Friendly
For longer storage, wrap each cupcake individually in plastic wrap and place them in a freezer‑safe bag. Freeze for up to 2 weeks. When you’re ready to enjoy, thaw the cupcakes in the refrigerator overnight. The frosting may become slightly stiff; add a splash of milk to soften it before serving. Freezing preserves the flavor and texture, making it a convenient option for holiday parties.
Best Reheating Method
To revive frozen cupcakes, preheat the oven to 300°F (150°C) and bake for 8–10 minutes. The cupcakes will warm through without drying out. Add a tiny splash of water to the frosting before reheating to create steam, which helps restore moisture. Let them cool for a few minutes before serving. This method keeps the cupcakes fluffy and the frosting smooth.