I still remember the night I accidentally created the most addictive hybrid in my kitchen. It was 2 AM, I'd just pulled a frozen pizza from the oven, and my roommate was demolishing a bag of garlic bread from the Italian place down the street. The smell hit me like a warm hug from Nonna herself — that intoxicating blend of yeasty bread, roasted garlic, and melted cheese. In my half-asleep, half-starved state, I slapped a slice of pizza between two pieces of that garlic bread and took a bite. The universe shifted. Crispy, buttery edges gave way to soft, chewy centers. Garlic perfume danced with tomato sauce. Cheese stretched into impossibly long strands. I stood there in my pajamas, mouth full, eyes wide, knowing I'd stumbled onto something dangerous. That first bite was like discovering fire — suddenly everything else seemed primitive.
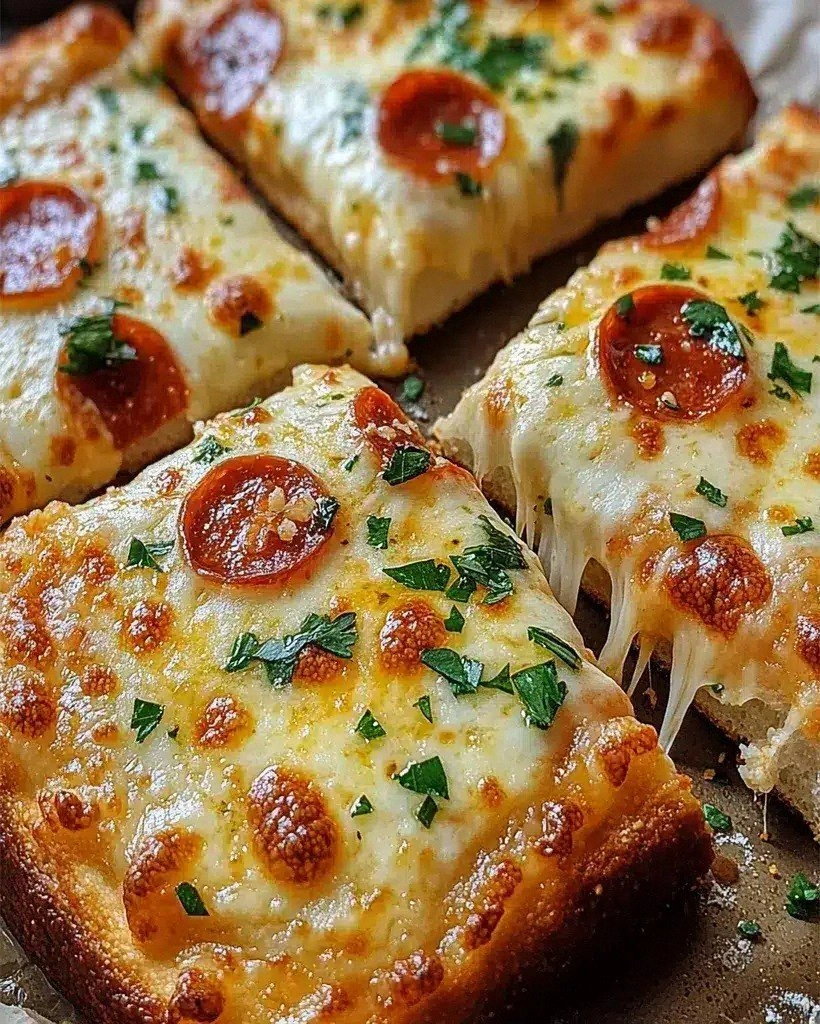
Fast forward three years and hundreds of experiments later, I've perfected what started as a midnight accident. This isn't just pizza on garlic bread, or garlic bread masquerading as pizza. This is a complete reimagining where every millimeter is engineered for maximum flavor impact. The crust isn't just a vehicle — it's a garlic-butter-soaked masterpiece that crackles like thin ice under your teeth while staying pillowy inside. The sauce is layered directly into the bread so it mingles with the garlic instead of sitting on top like an afterthought. And the cheese? We use a three-cheese blend that melts into glossy pools with those irresistible browned spots that taste like caramelized dreams.
Here's what makes me positively evangelical about this recipe: it takes 45 minutes from "I want this" to "I need to hide the rest from myself." No fancy equipment, no overnight fermentations, no skills beyond "can operate an oven without setting off smoke alarms." Yet the results taste like something you'd wait an hour in line for at that trendy place downtown where everything costs twice what it should. I've served this at game nights where grown adults literally licked their plates. I've made it for my nephew's birthday party and watched teenagers put down their phones — voluntarily — to grab seconds. I even brought it to a potluck where a woman threatened to marry me on the spot. (She was joking. Mostly.)
But the real magic happens in your own kitchen when you pull this bubbling, golden beauty from the oven. Picture it: steam curling up, carrying that impossible aroma of garlic, butter, and melting cheese. The crust edges are blistered and bronze, the cheese is molten and stretchy, and there's this moment — right before anyone takes a bite — where everyone just stops and stares. That collective inhale, that shared moment of anticipation? That's what cooking is all about. Let me walk you through every single step — by the end, you'll wonder how you ever made it any other way.
What Makes This Version Stand Out
Flavor Bomb: We're not just brushing garlic butter on top — we're infusing it throughout the dough. Every bite delivers that punchy, nutty garlic flavor that makes vampires weep and cardiologists cringe. (Worth it.) The secret is using both roasted garlic for sweetness and raw garlic for bite, creating layers of flavor that unfold like a well-crafted mystery novel.
Texture Play: This isn't the soggy, floppy mess you get when you try to turn regular garlic bread into pizza. We've engineered the perfect textural contrast: shatteringly crisp edges that give way to a chewy, almost focaccia-like interior. The bottom gets golden and crackly while the top stays soft enough to cradle all those beautiful toppings. It's like if croissants and pizza had a baby, and that baby grew up to be a supermodel.
Speed Demon: Most homemade pizza recipes make you wait hours for dough to rise, but we're using a clever shortcut that delivers all the yeasty flavor with none of the waiting. We're talking from zero to hero in under an hour. You could start this recipe during a commercial break and be eating before the show comes back on. I've done it. Multiple times. No regrets.
Ingredient Alchemy: Instead of just mozzarella, we're using a carefully calculated blend that includes provolone for stretch, parmesan for umami punch, and just a whisper of smoked gouda for depth. The result is cheese that melts into perfect pools with those Instagram-worthy brown spots that taste like concentrated pizza happiness. Your grocery store cheese aisle is about to become your playground.
Make-Ahead Magic: The dough actually gets better if you make it the night before and let it rest in the fridge. The flavors develop like they're attending flavor university, graduating with honors in Deliciousness. I've kept portions frozen for up to three months, and they bake up just as spectacularly. Sunday meal prep just became your new best friend.
Party MVP: Slice this into small squares and you've got the ultimate party food. It stays good at room temperature for hours (though it never lasts that long), and people lose their minds over it. I've seen introverts become social butterflies, carrying plates of this around and making new friends. It's not just food — it's a social lubricant with carbohydrates.
Customizable Canvas: While it's incredible plain, this garlic bread pizza is like a blank canvas for your wildest topping dreams. Want to add pepperoni? Go for it. Craving vegetables? They'll thank you for this vehicle. Feeling fancy with prosciutto and arugula? You've got refined taste, my friend. The base is bulletproof — it makes everything better.
Alright, let's break down exactly what goes into this masterpiece...
Inside the Ingredient List
The Flavor Foundation
Our all-purpose flour isn't just any flour — it's the workhorse that creates our perfect chewy texture. I've experimented with bread flour, 00 flour, even whole wheat (don't go there), and regular AP flour gives us that ideal balance of structure and tenderness. The protein content hits the sweet spot where the dough has enough gluten to get those beautiful air pockets, but not so much that it becomes tough and bready. If you only have bread flour, you can use it, but reduce the amount by two tablespoons and expect a slightly chewier result that'll still make you weep with joy.
Instant yeast is our time-saving hero here. Unlike active dry yeast, you don't need to proof it in warm water first — just whisk it straight into the flour and you're off to the races. Make sure yours is fresh (check the expiration date, not that I've learned this the hard way with flat, sad dough), and store it in the freezer to extend its life practically indefinitely. One packet costs less than a dollar and will make you dozens of pizzas, turning you into the most popular person in your apartment building.
Salt does more than just make things salty — it's the flavor amplifier that makes everything else taste more like itself. I use kosher salt because the larger crystals distribute more evenly throughout the dough. Table salt works in a pinch, but reduce the amount by about 25% because those fine grains pack more densely. Without enough salt, your dough will taste flat and lifeless, like that party where nobody danced.
The Garlic Trinity
Fresh garlic is non-negotiable here. Those pre-minced jars in oil? Leave them at the store with their sad, acrid flavor. We're using a whole head of garlic, and here's why: we're going to treat it three different ways. Some gets roasted into sweet, caramelized cloves that melt into the butter. Some gets minced and sautéed briefly to take off the raw edge while keeping its punch. And a small amount gets micro-planed directly into the dough for that background hum of garlic that makes people say "I can't quite identify what's different, but I love it."
Unsalted butter lets us control exactly how salty our final product is, and trust me, you'll want that control. European-style butter with higher fat content makes an even more luxurious garlic spread, but regular grocery store butter will still produce something that ruins all other garlic bread for you forever. The butter needs to be soft enough to mix but not melted — we're making garlic butter, not garlic oil soup. Leave it on the counter for an hour, or if you're impatient (hello, kindred spirit), cut it into small pieces and it'll soften in about fifteen minutes.
The Cheese Dream Team
Whole milk mozzarella gives us that legendary stretch and mild, milky flavor that forms the backbone of our cheese blend. Skip the part-skim stuff — it doesn't melt as beautifully and tastes like disappointment. Buy it in block form and shred it yourself. I know, I know, pre-shredded is easier, but it's coated in cellulose to prevent clumping, which also prevents it from melting into that glossy, cohesive layer we're after. Spend the extra three minutes shredding; your future self will thank you with every perfect cheese pull.
Provolone adds a subtle sharpness and incredible melting properties that mozzarella alone can't achieve. I use the aged variety for more complex flavor, but regular provolone works beautifully too. Cut it into small cubes rather than shredding — it melts into these gorgeous puddles that brown perfectly. If you can't find provolone, fontina makes an excellent substitute with similar melting characteristics and a slightly nuttier flavor profile.
Parmigiano-Reggiano isn't just for sprinkling on top — we're mixing some into our cheese blend for that addictive umami punch that makes people unable to stop eating. The real stuff aged for 24 months or more is worth every penny, but if your budget is tight, domestic parmesan will still elevate this from great to legendary. Never buy the pre-ground dust in the green can; it tastes like sawdust mixed with disappointment. Grate it fresh, and save the rind for soups — kitchen economy at its finest.
The Final Flourish
Italian seasoning isn't just for tourists — it's a carefully balanced blend that adds depth without overwhelming our star ingredients. If you're using a quality blend, it should contain oregano, basil, thyme, rosemary, and marjoram. Make your own by mixing equal parts dried oregano and basil with half parts thyme and a pinch of rosemary. Store it in a small jar and you'll find yourself adding it to everything from roasted vegetables to scrambled eggs.
Red pepper flakes give us that gentle heat that builds as you eat, making each bite slightly more exciting than the last. I use just enough to make your tongue tingle, not enough to send you running for milk. If you're sensitive to spice, you can omit them entirely, but I encourage you to try just a pinch — they awaken your taste buds and make all the other flavors pop like they've been given a good talking-to.
Everything's prepped? Good. Let's get into the real action...
The Method — Step by Step
- Start by making your dough because it needs a brief rest while you prep everything else. In a large bowl, whisk together 3 cups of all-purpose flour, 2¼ teaspoons of instant yeast, and 1½ teaspoons of kosher salt. Create a well in the center and pour in 1 cup of warm water (not hot — think comfortable bath temperature) and 2 tablespoons of olive oil. Using a wooden spoon, stir from the center outward, incorporating the flour gradually until a shaggy dough forms. Don't worry if it looks messy; that's exactly right. The dough should feel slightly sticky but not like it's trying to become one with your fingers.
- Turn the dough onto a lightly floured counter and knead for about 5 minutes. Here's the thing about kneading — people make it too complicated. Push the dough away with the heel of your hand, fold it back over itself, give it a quarter turn, and repeat. You're not trying to punish the dough; you're developing gluten strands that will give us those beautiful air pockets. After 5 minutes, it should feel smooth and elastic, like a baby's cheek but with more personality. If it's still sticky, resist the urge to add more flour — just keep kneading. Trust the process.
- While the dough rests, let's create the garlic butter that will change your life forever. Take your whole head of garlic and separate the cloves. Peel about 8 cloves (save the rest for another use) and roughly chop them. Now here's where we get clever: take half the chopped garlic and put it in a small pan with 4 tablespoons of your softened butter. Cook over medium-low heat just until the garlic is fragrant and starting to turn golden — about 3 minutes. Don't walk away from the stove here. Garlic goes from perfect to bitter faster than a cat changes moods.
- Remove from heat and let it cool slightly, then transfer to a bowl and add the remaining 4 tablespoons of softened butter. Add your minced raw garlic, a pinch of salt, and 1 teaspoon of your Italian seasoning. Mash everything together with a fork until it's a beautiful, fragrant paste. Taste it — it should make you want to spread it on everything from toast to your taxes. This is liquid gold, the foundation of our flavor empire. Set it aside but try not to eat it all with a spoon while the dough finishes resting.
- Preheat your oven to 475°F (245°C) and place a baking sheet or pizza stone inside to heat up. This is crucial for achieving that crispy bottom we want. While it heats, roll out your dough on a piece of parchment paper. Don't stress about making a perfect circle — rustic rectangles taste just as good and make you look like you shop at farmers' markets. Roll it to about ¼-inch thickness, but leave the edges slightly thicker to create that perfect crust border. If the dough springs back, let it rest for 5 minutes and try again. It's just being dramatic.
- Now comes the fun part — assembly. Spread your garlic butter all over the dough, right up to the edges. Be generous here; this isn't the time for restraint. You'll use about two-thirds of it, saving the rest for brushing on top later. Sprinkle your cheese blend evenly over the butter — first the mozzarella and provolone, then a shower of parmesan. Add your red pepper flakes now if using, and a final sprinkle of Italian seasoning. Slide the parchment paper with your creation onto the hot baking sheet or stone.
- Bake for 12-15 minutes until the cheese is bubbling and the edges are deep golden brown. The cheese should have those gorgeous brown spots that Italians call "the eyes of the pizza" — they're concentrated flavor bombs that will make you question everything you thought you knew about cheese. Your kitchen will smell like you've died and gone to garlic bread heaven. Don't be alarmed if neighbors start showing up with plates; this is normal. When it's done, let it rest for exactly 5 minutes — no less, or you'll burn your mouth; no more, or you'll lose that perfect cheese pull.
- Brush the crust edges with the remaining garlic butter immediately after it comes out of the oven. This final step creates that glistening, irresistible border that makes people fight over the crust pieces. Slice it into squares or traditional wedges — I won't judge your geometry skills. Serve it hot, but fair warning: it will disappear faster than free samples at Costco. I've seen grown adults burn their mouths because they couldn't wait five minutes. I may or may not be one of those adults.
That's it — you did it. But hold on, I've got a few more tricks that'll take this to another level...
Insider Tricks for Flawless Results
The Temperature Rule Nobody Follows
Here's the thing that separates good home cooks from great ones: temperature awareness. Your ingredients should be at the right temperature before you start. Butter needs to be soft enough to leave an indentation when pressed but not melted into an oily puddle. Cold butter won't incorporate properly, leaving you with weird lumps that refuse to spread. On the flip side, melted butter separates and your garlic will sink to the bottom instead of staying suspended in buttery heaven. If you're in a rush, cut your butter into small cubes and spread them on a plate — they'll soften in about 10 minutes instead of an hour. I've also been known to place the wrapped butter in my armpit while prepping other ingredients. Desperate times call for desperate measures, and nobody needs to know your secret weapon is body heat.
Why Your Nose Knows Best
Forget timers — your nose is the most sophisticated piece of kitchen equipment you own. When this pizza is perfectly baked, your kitchen will fill with the aroma of deeply toasted garlic, nutty brown butter, and caramelized cheese. It's unmistakable and triggers something primal in your brain that says "drop everything and eat now." If you only rely on timers, you'll miss the magical moment when everything comes together. That said, don't be the person who burns it because you got distracted by Instagram. Set a timer for 2 minutes before the minimum time, then hover like a helicopter parent. The sizzle when you open the oven door should sound like applause — steady and enthusiastic, not frantic (too hot) or lethargic (not hot enough).
The 5-Minute Rest That Changes Everything
I know you're going to want to cut into this immediately. The smell is driving you crazy, your stomach is doing somersaults, and that cheese is calling your name. But here's where you channel your inner zen master and wait exactly 5 minutes. This isn't some pretentious chef rule — it's pure science. The cheese needs time to set slightly so it doesn't all slide off when you slice it. The garlic butter needs a moment to soak into the crust. More importantly, molten cheese retains heat like lava and will absolutely destroy the roof of your mouth, leaving you unable to taste the rest of your meal. I've seen people (okay, me) burn their tongues so badly they couldn't enjoy food for days. Practice delayed gratification; your future self will thank you with every perfect bite.
Storage Secrets for Maximum Freshness
If by some miracle you have leftovers, let them cool completely before storing. Wrap individual pieces in foil and store in an airtight container in the fridge. When reheating, skip the microwave (it makes the crust rubbery and sad) and use a dry skillet over medium heat. Place the pizza crust-side down for 2-3 minutes, then flip and cover for another minute. This resurrects the crispy bottom and melts the cheese perfectly. For longer storage, freeze pieces on a baking sheet until solid, then transfer to a freezer bag. They'll keep for up to 3 months and reheat beautifully in a 400°F oven for 8-10 minutes straight from frozen. It's like having emergency happiness stashed away for bad days.
The Make-Ahead Method for Busy Lives
You can prep the dough up to 3 days ahead and keep it refrigerated. Just bring it to room temperature for 30 minutes before rolling. The garlic butter keeps for a week in the fridge or 3 months frozen — I make double batches and freeze half in ice cube trays for instant garlic bread emergencies. You can even assemble the whole pizza on parchment, slide it onto a baking sheet, and freeze it unbaked. Once solid, wrap it well and it becomes the world's most impressive convenience food. Bake from frozen at 450°F for 18-20 minutes, adding a few extra minutes to achieve that perfect golden color. Having homemade garlic bread pizza ready to go makes you feel like you've got your life together, even if you're eating it in pajamas while binge-watching reality TV.
Creative Twists and Variations
This recipe is a playground. Here are some of my favorite ways to switch things up:
The Everything Bagel Edition
Replace the Italian seasoning with everything bagel seasoning (yes, the Trader Joe's kind, or make your own with sesame seeds, poppy seeds, dried garlic, dried onion, and salt). Use cream cheese in place of half the mozzarella for that authentic bagel experience. Top with thinly sliced red onion and capers after baking. It's like Sunday morning brunch and late-night pizza had a beautiful baby that will ruin all other bagels for you forever.
The Mediterranean Masterpiece
Add chopped kalamata olives, sun-dried tomatoes, and crumbled feta to the cheese blend. After baking, shower it with fresh oregano, a drizzle of good olive oil, and a squeeze of lemon. The briny olives and tangy feta dance with the garlic in ways that will transport you straight to a Greek island. I've served this at dinner parties where people assumed I'd hired a caterer. The secret stays between us.
The Breakfast of Champions
Top the cheese with thin slices of prosciutto before baking. When it comes out of the oven, crack two eggs onto the hot surface, return to the oven for 3-4 minutes until the whites are set but yolks are still runny. Finish with fresh chives and black pepper. It's like the world's most sophisticated breakfast sandwich, except it's pizza and therefore infinitely better. Weekend brunch will never be the same.
The Buffalo Wing Wonder
Mix 2 tablespoons of buffalo sauce into your garlic butter for a gentle heat that builds. Top with shredded chicken tossed in more buffalo sauce, then add blue cheese crumbles in the last 5 minutes of baking. Drizzle with ranch dressing and chopped celery leaves. It's all the flavors of game day wings without the messy fingers and sauce all over your face. Though honestly, you'll still probably get it on your face because it's that good.
The Veggie Victory
Before baking, add thinly sliced mushrooms, bell peppers, and red onion. The key is slicing everything paper-thin so it cooks quickly and doesn't make the crust soggy. After baking, add fresh arugula that wilts slightly from the heat, creating a peppery contrast to the rich garlic butter. Even die-hard carnivores devour this version and ask for the recipe. It's like sneaking vegetables into a party where they become the life of it.
The Dessert Plot Twist
Okay, stay with me here — omit the garlic and Italian seasoning from half the butter. After baking the savory version, brush the edges with cinnamon sugar butter and serve with a side of cream cheese frosting for dipping. The sweet-savory combination is weirdly addictive, like when you can't stop eating kettle corn. I discovered this by accident when I mixed up my butter containers, and now it's my party trick for confusing and delighting guests in equal measure.
Storing and Bringing It Back to Life
Fridge Storage
Let any leftovers cool completely — I mean it, walk away for at least 30 minutes — then wrap individual pieces tightly in foil or plastic wrap. Store them in an airtight container in the refrigerator for up to 4 days. Any longer and the garlic starts to taste tired and the crust becomes a shadow of its former self. But honestly, in my house, it never lasts more than 24 hours before someone (okay, me) "rediscovers" it at midnight. Label your container if you live with other humans, or accept that leftover garlic bread pizza is a communal resource subject to the law of the jungle.
Freezer Friendly
This recipe freezes like a dream, making it the ultimate emergency comfort food. For best results, freeze individual pieces on a baking sheet until solid, then transfer to freezer bags with as much air removed as possible. They'll keep for up to 3 months, though I recommend lying to yourself and writing 2 months on the bag so you actually eat them while they're at peak deliciousness. You can also freeze the unbaked assembled pizza — just add 5-8 extra minutes to the cooking time from frozen. Pro tip: freeze some garlic butter separately so you can refresh the crust edges after reheating. Future you will think present you is a genius.
Best Reheating Method
The microwave is your enemy here — it turns the crust rubbery and makes the cheese separate into an oily mess. Instead, use a dry skillet over medium heat. Place the pizza crust-side down for 2-3 minutes until the bottom is crispy and you can hear it sizzling happily. Then flip it, add a tiny splash of water to the pan (just a teaspoon), and cover immediately. The steam melts the cheese while keeping the bottom crisp. Alternatively, reheat in a 400°F oven directly on the rack for 5-6 minutes, or use an air fryer at 350°F for 3-4 minutes if you're lucky enough to own one. The goal is to revive both the crispness and the gooeyness, not just warm it up.