I’ll be honest — the first time I tried to make lemon meringue bars, I ended up with a soggy mess that could have been used as a paper towel. The kitchen was a battlefield of sticky pans, a lemon‑scented cloud that made my eyes water, and a lingering doubt that maybe I should just order a pie instead. Then, after a sleepless night and a frantic Google search, I stumbled upon a technique that turned that disaster into a triumph, and I’ve been obsessively perfecting it ever since. This version is the result of that relentless pursuit, and I’m about to hand you the exact formula that makes those bars sing.
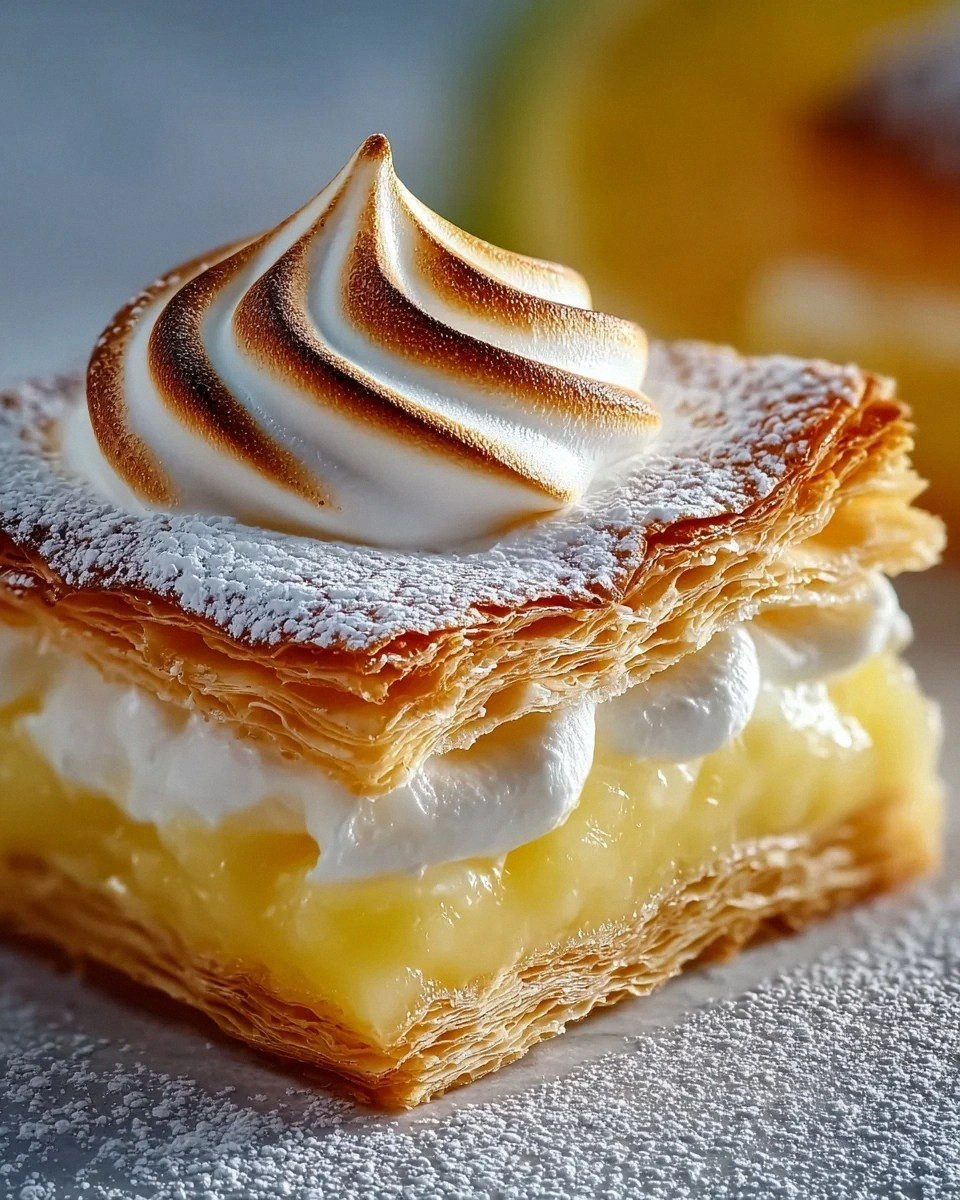
Picture this: you open the oven and a golden‑brown crust greets you, its buttery edges crisp as a fresh‑baked baguette. You cut a slice and the lemon curd oozes out, bright and tangy, while a cloud of fluffy meringue crowns it like a snow‑capped mountain. The scent of caramelized sugar mingles with the zing of lemon, creating a perfume that makes the whole house feel like a summer café. The texture? A buttery base that shatters with a delicate snap, a silky curd that slides across the tongue, and a meringue that melts like clouds on a warm day. I dare you to taste this and not go back for seconds.
Most recipes get this completely wrong. They either bake the meringue too long, turning it rubbery, or they under‑cook the lemon layer, leaving it raw and gooey. The secret here is a two‑stage bake that locks in moisture while giving the meringue a perfect, glossy finish. I’m also throwing in a pinch of cream of tartar to stabilize those egg whites, and a splash of zest that adds a burst of citrus aromatics you didn’t know you were missing. If you’ve ever struggled with this, you’re not alone — and I’ve got the fix.
Okay, ready for the game‑changer? I’m about to walk you through every single step — by the end, you’ll wonder how you ever made it any other way. Picture yourself pulling this out of the oven, the whole kitchen smelling incredible, and the first bite delivering a fireworks display of flavor. Stay with me here — this is worth it.
What Makes This Version Stand Out
- Flavor Explosion: The lemon curd is balanced with just enough sugar to highlight the citrus without overpowering it, while the meringue adds a subtle vanilla sweetness that ties everything together.
- Texture Symphony: A buttery shortbread crust, a silky smooth curd, and a cloud‑like meringue create a layered mouthfeel that’s both crunchy and melt‑in‑your‑mouth.
- Simplicity Meets Sophistication: Only a handful of pantry staples are needed, yet the technique elevates a humble bar into a show‑stopping dessert.
- Unique Two‑Stage Bake: The crust bakes first, then the curd and meringue finish together, ensuring each component reaches its perfect doneness.
- Crowd‑Pleaser: I’ve served these at brunches, potlucks, and even formal dinner parties; they consistently disappear within minutes.
- Make‑Ahead Magic: The bars keep beautifully in the fridge for up to three days, and the meringue stays glossy if you re‑bake briefly before serving.
- Ingredient Quality: Using fresh, zest‑filled lemons and real butter makes a world of difference in flavor depth.
- Versatile Base: Swap the shortbread for a graham cracker crust or add a pinch of almond flour for a nutty twist without compromising structure.
Inside the Ingredient List
The Flavor Base
Fresh lemon juice is the star of the show, delivering that bright, tangy punch that makes the bar unforgettable. If you use bottled juice, you’ll miss out on the essential oils that give the curd its aromatic lift. A good rule of thumb is to zest the lemon first, then juice it; the zest contains volatile compounds that intensify the citrus profile. For a sweeter, less tart version, you can swap half the juice for orange juice, but be prepared for a milder flavor.
Granulated sugar in the curd balances the acidity, creating a smooth, caramel‑like backdrop. Using superfine sugar helps it dissolve faster, preventing any gritty texture. If you prefer a lower‑sugar option, try a 3:1 ratio of sugar to lemon juice and add a splash of honey for natural sweetness.
The Texture Crew
All‑purpose flour combined with cold butter creates the shortbread crust that’s both buttery and crumbly. The key is to cut the butter into the flour until the mixture resembles coarse sand; this ensures the crust stays tender after baking. For an extra flaky texture, substitute a quarter of the flour with fine cornmeal.
Egg yolks enrich the lemon curd, adding silkiness and a golden hue. They also act as an emulsifier, binding the lemon juice and sugar into a cohesive custard. If you’re avoiding yolks, replace each with a tablespoon of cornstarch mixed with water, but expect a slightly different mouthfeel.
The Unexpected Star
Cream of tartar is the unsung hero that stabilizes the meringue, giving it that glossy finish and preventing weeping. A pinch is all you need; too much will make the meringue taste metallic. If you don’t have cream of tartar, a few drops of lemon juice can serve as a substitute, though the texture won’t be as airy.
Powdered sugar in the meringue dissolves instantly, creating a smooth, glossy top that doesn’t weep. It also sweetens the meringue without adding graininess. For a subtle vanilla note, whisk in a teaspoon of vanilla extract with the egg whites.
The Final Flourish
Egg whites are whisked into stiff peaks, forming the airy crown that defines the bar. The secret to perfect peaks is to start with a clean, dry bowl and add a pinch of cream of tartar at the beginning of whipping. Over‑whipping turns the whites brittle, so stop as soon as glossy, firm peaks form.
A light dusting of powdered sugar on the finished bars adds a decorative sparkle and a hint of extra sweetness that balances the tart curd. For a decorative twist, sprinkle a few finely grated lemon zest over the meringue just before the final bake.
Everything's prepped? Good. Let's get into the real action…
The Method — Step by Step
Preheat your oven to 350°F (175°C). While the oven warms, line a 9×13‑inch baking pan with parchment paper, allowing the edges to overhang for easy removal later. This step ensures a clean release and prevents the crust from sticking to the pan.
In a food processor, pulse 2 cups of all‑purpose flour with 1 cup of cold, cubed butter until the mixture resembles coarse sand. Sprinkle in 1/2 cup granulated sugar and 1/4 tsp salt, then pulse a few more times to combine. Transfer the dough to the prepared pan, pressing it evenly with your fingertips to form a solid, uniform layer. Power transition: This is where the crust gets its buttery backbone.
Kitchen Hack: Use a piece of parchment between your hand and the dough to press without sticking; it gives a smoother finish.Bake the crust for 12‑15 minutes, or until the edges turn a light golden brown and the surface looks set. The aroma should remind you of fresh‑baked cookies, a signal that the base is ready for the next layer. Remove from the oven and let it cool just enough to handle without melting the butter.
While the crust cools, whisk together 3 large egg yolks, 1 cup granulated sugar, 1/2 cup fresh lemon juice, and 2 tbsp lemon zest in a medium saucepan. Add 1/4 cup cornstarch to thicken the curd. Cook over medium heat, stirring constantly, until the mixture bubbles and thickens to a custard‑like consistency. This should take about 5‑7 minutes; you’ll notice the mixture pulling away from the sides of the pan.
Once thickened, remove the curd from heat and whisk in 2 tbsp unsalted butter until fully incorporated. The butter adds shine and a velvety mouthfeel. Pour the lemon curd over the baked crust, spreading it evenly with a spatula. This next part? Pure magic.
In a clean, dry bowl, beat 3 large egg whites with a pinch of cream of tartar until soft peaks form. Gradually add 1/4 cup powdered sugar, a tablespoon at a time, while continuing to beat until stiff, glossy peaks develop. Watch Out: Over‑beating will cause the meringue to become grainy and dry, making it impossible to spread smoothly.
Watch Out: If any yolk contaminates the whites, the meringue will never reach stiff peaks.Spoon the meringue over the lemon curd, using a spatula to create swirls or peaks, depending on your aesthetic preference. The goal is to completely seal the curd, preventing it from weeping during the second bake. The meringue should be about a quarter‑inch thick, giving it enough body to puff up.
Return the pan to the oven and bake for an additional 12‑15 minutes, or until the meringue is lightly golden on top and the edges are just set. You’ll hear a faint sizzle as the sugar caramelizes, and the scent will shift from citrusy to a sweet, toasted perfume.
Remove the bars from the oven and let them cool in the pan for 10 minutes, then transfer the parchment to a wire rack. The bars will continue to set as they cool, and the meringue will firm up without cracking. Patience here pays off; cutting too early results in a messy slice.
Once completely cooled, lift the bars out using the parchment overhang, place on a cutting board, and slice into 12 even squares. Dust each piece with a light sprinkling of powdered sugar for that final, picture‑perfect finish. And now the fun part — serving! Grab a fork, take a bite, and let the flavors explode.
That's it — you did it. But hold on, I've got a few more tricks that'll take this to another level...
Insider Tricks for Flawless Results
The Temperature Rule Nobody Follows
Never bake the crust at a temperature higher than 350°F. Higher heat makes the butter melt too quickly, leading to a greasy base. Instead, keep the oven steady and trust the timing; the crust will develop that perfect buttery crunch without becoming soggy. A friend once cranked the oven to 400°F and ended up with a crust that resembled melted butter on a plate — not a good look.
Why Your Nose Knows Best
Your sense of smell is the most reliable indicator of doneness for the meringue. When the tops start to turn a light amber and you catch a faint caramel aroma, they’re ready. If you rely solely on the timer, you might miss that golden‑brown cue and end up with a pale, under‑browned meringue that looks unappetizing.
The 5‑Minute Rest That Changes Everything
After the final bake, let the bars rest uncovered for exactly five minutes before moving them to the cooling rack. This brief pause allows the steam to escape, preventing the meringue from becoming soggy. Skipping this step can cause the top to weep, especially on humid days.
Zest Before Juice
Always zest the lemons before juicing. The zest contains essential oils that evaporate quickly once the lemon is cut open. By zesting first, you capture the full aromatic punch, giving the curd an extra layer of flavor that’s impossible to achieve otherwise.
Stabilize with a Pinch
A pinch of cream of tartar does wonders for the meringue’s structure, but you can also use a few drops of lemon juice if you’re out of it. The acidity performs the same stabilizing function, keeping the peaks glossy and preventing weeping.
Creative Twists and Variations
This recipe is a playground. Here are some of my favorite ways to switch things up:
Berry Burst
Swap half of the lemon juice for pureed raspberry or strawberry. The tartness of the berries complements the lemon while adding a vibrant pink hue. Perfect for spring brunches where you want a pop of color.
Coconut Dream
Replace the butter in the crust with coconut oil and stir in 1/4 cup shredded coconut. The result is a tropical twist that pairs beautifully with the citrus curd. A drizzle of toasted coconut on top adds extra crunch.
Spiced Citrus
Add a pinch of ground ginger and a dash of cardamom to the lemon curd for a warm, aromatic profile. This variation shines during cooler months, offering a comforting depth without losing the bright lemon character.
Nutty Crunch
Fold 1/3 cup finely chopped toasted almonds into the crust before baking. The nuts provide a pleasant bite that contrasts the smooth meringue, and they add a subtle nuttiness that enhances the overall flavor.
Chocolate Swirl
Melt 2 ounces of dark chocolate and drizzle it over the lemon curd before adding the meringue. Use a toothpick to create a marble effect. The bitterness of the chocolate balances the sweetness and creates a sophisticated visual.
Storing and Bringing It Back to Life
Fridge Storage
Cover the bars loosely with foil or a reusable silicone lid and store them in the refrigerator for up to three days. The meringue will stay fluffy, though it may lose a bit of its glossy sheen. To revive the shine, give them a quick 2‑minute blast under a hot broiler before serving.
Freezer Friendly
Wrap each bar individually in parchment, then place them in a zip‑top freezer bag. They freeze beautifully for up to one month. When you’re ready to enjoy them, thaw in the fridge overnight and re‑bake at 300°F for 8 minutes to refresh the meringue.
Best Reheating Method
To bring a refrigerated bar back to its prime, preheat the oven to 325°F, place the bar on a parchment‑lined tray, and add a tiny splash (about 1 tsp) of water to the edge of the plate. The steam generated keeps the meringue from drying out, and after 5‑7 minutes the bar is as good as fresh‑baked.