Picture this: I’m standing in my cramped kitchen, the stove already buzzing, and my friend’s text blaring on my phone – “You’re going to love this, but you’ll need to taste it before you finish it.” I’ve spent the last decade chasing the perfect one‑pan meal, and I finally cracked the code with a honey‑BBQ chicken rice that feels like a hug in a bowl. The moment I slid the pan onto the heat, a caramelized aroma rolled in, mingling with the sweet tang of honey and the smoky whisper of paprika. The sizzle was a drumbeat, the sizzling sound a promise that flavor was about to break out of the pan and into my taste buds. I dare you to taste this and not go back for seconds.
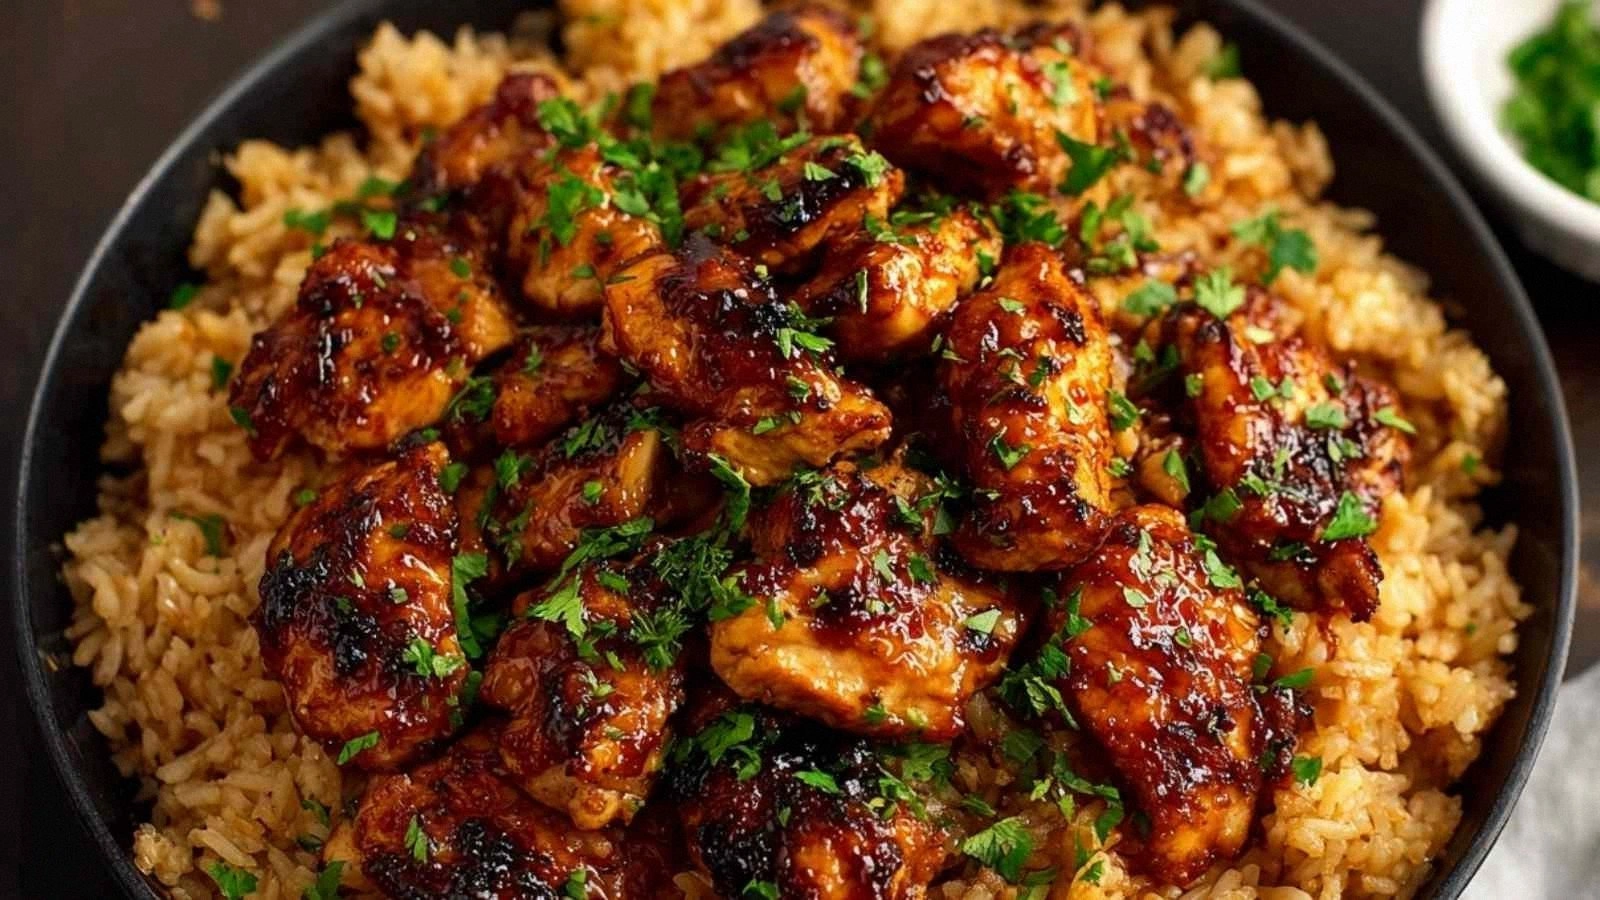
The first bite was a revelation: tender chicken, perfectly crisp edges, and that honey‑BBQ sauce coating the rice like velvet. The corn and peas popped with a satisfying snap, and the cheddar melted into a gooey, golden layer that made every spoonful feel indulgent. I’ve tried countless “one‑pan” recipes that end up either dry or overly greasy, but this version keeps everything moist while still giving you that satisfying, slightly charred bite. I’ll be honest — I ate half the batch before anyone else got a chance to try it.
What sets this dish apart isn’t just the taste; it’s the method. I use a single skillet, no more pots, no more dishes to wash. The chicken is seared to a deep golden crust before the rice is added, locking in juices and creating a flavor base that’s impossible to replicate with a separate pot. The broth and sauce are blended in a way that ensures each grain of rice absorbs that sweet‑savory glaze without becoming mushy. Picture yourself pulling this out of the oven, the whole kitchen smelling incredible, and the family’s faces lighting up as they dive in.
If you’ve ever struggled with one‑pan meals that fall flat, you’re not alone — and I’ve got the fix. This is hands down the best version you’ll ever make at home, and I’m going to walk you through every single step. By the end, you’ll wonder how you ever made it any other way.
What Makes This Version Stand Out
- Taste: The honey‑BBQ sauce is balanced, sweet yet tangy, with a smoky kick that elevates the chicken and rice. It’s like a caramelized glaze that coats every bite.
- Texture: The chicken’s crust is crisp and caramelized, while the rice remains fluffy and slightly chewy. The corn and peas add a burst of freshness.
- Simplicity: One pan, one pot, one cleanup. No extra bowls or utensils needed.
- Uniqueness: The addition of smoked paprika gives the dish a subtle depth that most BBQ recipes miss.
- Crowd Reaction: Guests ask for seconds before the dish is even served. I’ve had people line up for the last spoonful.
- Ingredient Quality: Fresh, high‑quality chicken and fresh‑frozen corn and peas make the difference between ordinary and extraordinary.
- Cooking Method: Searing before simmering locks in juices and creates a caramelized crust that’s hard to achieve with a simple simmer.
- Make‑Ahead Potential: Cooked rice and chicken can be reheated without losing flavor, making it perfect for meal prep.
Inside the Ingredient List
The Flavor Base
The honey‑BBQ sauce is the heart of this dish. It’s sweet, tangy, and smoky, providing a glaze that sticks to the chicken and rice. The smoked paprika adds a subtle depth that turns a simple BBQ sauce into something memorable. If you skip paprika, you’ll miss that smoky undertone that rounds out the sweetness.
The Texture Crew
The rice and broth create the canvas. The rice should be rinsed until the water runs clear, ensuring it stays fluffy. The broth’s 1.5 cups of liquid give the rice just enough moisture to steam without becoming soggy. If you use too much liquid, the rice will absorb the sauce but lose its bite.
The Unexpected Star
Frozen corn and peas are the unsung heroes. They bring a pop of color, sweetness, and a satisfying crunch. Using frozen saves prep time and keeps the dish fresh. If you prefer fresh, just blanch them briefly before adding.
The Final Flourish
Shredded cheddar cheese and green onions finish the dish with a creamy, savory top layer. The cheese melts into a gooey coating that ties everything together. Green onions add a fresh, sharp bite that balances the sweetness. If you’re dairy‑free, a sprinkle of nutritional yeast can mimic the cheesy texture.
Everything’s prepped? Good. Let’s get into the real action.
The Method — Step by Step
- Prep the chicken. Pat the chicken breasts dry with paper towels to ensure a crisp sear. Season generously with salt, pepper, and smoked paprika. This step is critical; a dry surface guarantees a golden crust. I’ve seen too many recipes skip the drying step, leading to soggy results.
- Heat the skillet. Place a large non‑stick skillet over medium‑high heat and add the tablespoon of olive oil. The oil should shimmer but not smoke. This creates a high‑temperature surface for searing. Watch the oil; if it starts smoking, reduce the heat.
- Sear the chicken. Lay the chicken breasts in the hot pan, skin‑side down if applicable. Let them sear undisturbed for 3–4 minutes until a deep golden crust forms. Flip and sear the other side for another 3 minutes. The sizzle should be audible and comforting.
- Remove the chicken. Transfer the chicken to a plate and set aside. This prevents overcrowding when you add the rice, which could cause steaming instead of browning.
- Sauté aromatics. In the same pan, add the diced onion and minced garlic. Cook until translucent and fragrant, about 2 minutes. The onion should soften without browning too quickly. This builds the flavor foundation.
- Add rice and liquids. Stir in the uncooked rice, coating it with the onion and garlic mixture. Pour in the chicken broth and honey‑BBQ sauce, then bring to a gentle simmer. The mixture should bubble softly, not boil aggressively.
- Return chicken and add veggies. Nestle the seared chicken breasts back into the pan, placing them on top of the rice. Sprinkle the frozen corn and peas over the top. Cover the skillet with a lid and let it simmer for 15 minutes, or until the rice is tender and the liquid is absorbed.
- Finish with cheese. Remove the lid, sprinkle shredded cheddar cheese over the entire surface, and cover again for 2 minutes until the cheese melts. The melted cheese will create a glossy, savory crown. If you prefer a sharper flavor, add a pinch of cayenne pepper.
- Garnish and serve. Sprinkle chopped green onions on top for a fresh bite. Slice the chicken into strips if desired. Plate the rice and chicken together, ensuring the melted cheese stays in place. The dish should look golden, steaming, and ready to devour.
That’s it — you did it. But hold on, I’ve got a few more tricks that will take this to another level.
Insider Tricks for Flawless Results
The Temperature Rule Nobody Follows
Most people cook rice on high heat, but this dish benefits from a gentle simmer. After adding the broth, lower the heat to medium‑low and let it cook for 15 minutes. This slow simmer keeps the rice fluffy and prevents the sauce from burning. I once cooked it on high and ended up with a sticky mess.
Why Your Nose Knows Best
Smell is a powerful indicator of doneness. When the rice is ready, the aroma should be rich and slightly caramelized. If the smell is overly sour, the broth has likely reduced too much. Trust your nose; it knows when the dish is finished.
The 5‑Minute Rest That Changes Everything
After the cheese melts, let the pan sit covered for 5 minutes off the heat. This rest period allows the flavors to meld and the rice to finish steaming. It also makes the rice easier to fluff with a fork. Skipping this step can leave the dish a little dry.
The Secret Ingredient Swap
If you’re craving a bit of heat, add a dash of sriracha or a pinch of red pepper flakes to the sauce. It’s a simple tweak that turns a sweet dish into a spicy adventure. I’ve seen friends rave about the added kick.
The Quick Clean‑Up Trick
After cooking, wipe the pan with a paper towel before it cools. This removes any stuck-on bits and prevents them from burning during future use. I always keep a small bowl of warm soapy water nearby for a quick rinse.
Creative Twists and Variations
Curry‑Inspired Twist
Replace the honey‑BBQ sauce with a mild coconut‑curry sauce. Add a splash of coconut milk and a teaspoon of curry powder. The result is a creamy, aromatic dish that still feels comforting. Perfect for a quick weeknight dinner.
Mexican Fiesta
Swap the cheddar for crumbled queso fresco and sprinkle chopped cilantro on top. Add a dash of cumin to the rice and a squeeze of lime at the end. The bright citrus notes cut through the sweetness, creating a vibrant, fiesta‑ready meal.
Mediterranean Flair
Use a Mediterranean‑style tomato sauce instead of honey‑BBQ, and add chopped kalamata olives and sun‑dried tomatoes. Finish with a drizzle of olive oil and a sprinkle of oregano. The salty olives and tangy tomatoes give it a complex, savory profile.
Vegan Version
Replace the chicken with firm tofu cubes, seasoned and seared until golden. Use a vegan honey‑BBQ sauce, and add a splash of soy sauce for umami. The tofu absorbs the sauce beautifully, and the dish remains hearty and satisfying.
Low‑Carb Upgrade
Swap the white rice for cauliflower rice or a mixture of quinoa and cauliflower. The texture changes but the flavor remains. It’s a great option for those watching their carb intake without sacrificing taste.
Breakfast‑Style Brunch
Add a handful of spinach and a few slices of fresh mozzarella to the pan. Serve the dish with a side of toasted English muffins. The combination of savory, cheesy, and slightly sweet flavors makes for an unexpected brunch hit.
Storing and Bringing It Back to Life
Fridge Storage
Cool the dish completely before transferring to an airtight container. Store in the refrigerator for up to 4 days. When reheating, add a splash of water or broth to keep the rice moist. I keep a small jar of broth in the fridge for this purpose.
Freezer Friendly
Divide the dish into single‑serving portions and wrap tightly in freezer paper or plastic wrap. Freeze for up to 3 months. When ready to eat, thaw overnight in the fridge or microwave on defrost. The cheese may separate slightly, but a quick stir will restore creaminess.
Best Reheating Method
Reheat in a skillet over low heat, adding a small splash of water to create steam. Stir gently to distribute heat evenly. Finish with a sprinkle of fresh green onions for a bright, fresh finish. This method preserves the texture and flavor better than microwaving.