Picture this: a rainy Saturday afternoon, the kind where the clouds look like they’re about to spill the whole sky into your kitchen. I was halfway through a marathon of “bake‑it‑till‑you‑drop” videos when my roommate shouted, “I dare you to make something that screams patriotism without sounding like a fireworks show!” I laughed, grabbed the nearest mixing bowl, and thought, “Why not cupcakes that wear the flag like a proud badge?” Little did I know that a simple dare would evolve into the most talked‑about batch of red, white, and blue cupcakes I’ve ever baked. The first whiff of vanilla and butter hit me like a warm hug, and the bright red swirl of batter reminded me of a sunrise over the Hudson River—vivid, bold, and impossible to ignore.
The kitchen turned into a sensory playground. The clink of the whisk against the stainless steel bowl was a metronome for my excitement, while the soft thud of butter hitting the counter sounded like applause. The batter’s texture was silky, almost like a satin sheet sliding over a polished marble floor. When the cupcakes rose in the oven, they released a faint caramel aroma that made my stomach do a happy jig, and the moment I lifted the first one out, the heat kissed my fingertips, leaving a faint, comforting warmth that lingered like a summer breeze.
Now, most red, white, and blue cupcake recipes either drown the flavors in a sea of artificial dye or forget the crucial balance between cake and frosting. This version? It’s the antidote. I’ve swapped cheap food coloring for a tiny splash of natural beet juice for the red and a whisper of blueberry puree for the blue, giving each hue a subtle fruit note that dances on the palate. The frosting is a butter‑cream masterpiece that’s airy enough to melt on your tongue yet sturdy enough to hold its shape for those perfect swirls. The secret? A pinch of cream of tartar that keeps the crumb tender and the frosting glossy, plus a technique that layers color without the dreaded streaks.
But wait—there’s a twist that will make you gasp. Instead of the usual vanilla extract, I’m using a splash of almond‑orange liqueur (optional, of course) that adds a nuanced depth, making the cupcakes feel like a celebration in a glass. I’m about to walk you through every single step—by the end, you’ll wonder how you ever made cupcakes any other way. Okay, ready for the game‑changer?
What Makes This Version Stand Out
- Flavor Fusion: The almond‑orange liqueur in the batter creates a sophisticated undertone that elevates the sweet vanilla base without overpowering the patriotic colors.
- Texture Triumph: A blend of cake flour and a dash of cream of tartar yields a crumb that’s feather‑light on the inside yet holds a gentle bite on the outside.
- Simplicity Meets Showmanship: All the color magic happens in two bowls, no need for a rainbow of separate batters—saving time and cleaning effort.
- Ingredient Quality: Using real beet juice and blueberry puree replaces synthetic dyes, giving each bite a hint of natural fruit that’s both beautiful and flavorful.
- Crowd Reaction: Guests have called these cupcakes “the most patriotic dessert they’ve ever tasted” and have been known to request a second round before the first even cools.
- Make‑Ahead Potential: The cupcakes stay moist for up to three days, and the frosting can be frozen for a month, making it a perfect make‑ahead dessert for holidays.
- Versatile Presentation: Whether you pipe stars, stripes, or simple swirls, the frosting holds its shape beautifully, allowing endless creative displays.
- Confidence Booster: The bold colors and balanced flavors make you feel like a pastry pro, even if you’ve never attempted a layered cupcake before.
Inside the Ingredient List
The Flavor Base
All‑purpose flour (2 cups): This is the backbone of the cupcake, providing structure without making the crumb dense. If you swap in cake flour, you’ll get an even softer texture, but the recipe is calibrated for the protein level in all‑purpose flour. Choose a brand that’s unbleached for a cleaner taste.
Granulated sugar (1½ cups): Sugar not only sweetens but also contributes to the tender crumb by inhibiting gluten formation. Skipping it or reducing it dramatically will leave you with a flat, bland cupcake. For a slightly caramelized note, you could replace half with light brown sugar.
Unsalted butter, softened (½ cup for cake, 1 cup for frosting): Butter adds richness and moisture. The key is to soften it at room temperature, not melt it, so it can trap air during creaming. If you use salted butter, cut the added salt in half to avoid over‑salting.
The Texture Crew
Eggs (2 large): Eggs act as emulsifiers, binding the fat and liquid together, and they also help the cupcakes rise. Using room‑temperature eggs ensures they blend smoothly; cold eggs can cause the batter to curdle.
Whole milk (½ cup): Milk adds moisture and a subtle dairy flavor. For a richer taste, substitute half with heavy cream, but keep the total liquid volume the same to maintain the proper batter consistency.
Baking powder (2 tsp) and salt (½ tsp): The leavening duo lifts the cupcakes, while the salt amplifies the sweet and buttery notes. Too much baking powder can cause the cupcakes to rise too quickly and then collapse.
The Unexpected Star
Beet juice (2 tbsp) for red: This natural dye gives a deep ruby hue and a faint earthy sweetness that pairs beautifully with vanilla. If you’re allergic to beets, a few drops of red gel food coloring work just as well, though you’ll lose the subtle flavor.
Blueberry puree (2 tbsp) for blue: Fresh or frozen blueberries blended into a smooth puree provide a vibrant cobalt shade and a whisper of fruit acidity. Strain the puree if you want a brighter color without specks.
Almond‑orange liqueur (1 tsp, optional): A splash of this liqueur adds a sophisticated citrus‑nutty note that lifts the entire flavor profile. If you prefer a non‑alcoholic version, replace with orange zest and a few drops of almond extract.
The Final Flourish
Powdered sugar (3 cups for frosting): This fine sugar dissolves instantly, creating a smooth buttercream that spreads like silk. Sift it to avoid lumps that could ruin the frosting’s texture.
Heavy cream (2 tbsp) and vanilla extract (1 tsp): The cream lightens the frosting, while vanilla adds depth. If you need a dairy‑free version, use coconut cream and a splash of vanilla bean paste.
Additional food coloring (2 drops each for frosting): Match the cake colors for a cohesive look, or keep the frosting white for a classic “stars and stripes” effect. Remember, a little goes a long way—add gradually.
Everything's prepped? Good. Let's get into the real action…
The Method — Step by Step
Preheat your oven to 350°F (175°C) and line a 12‑cup muffin tin with paper liners. While the oven warms, whisk together the flour, baking powder, and salt in a medium bowl; this aerates the dry ingredients and ensures even leavening. Feel the fine powder slip through your fingers—this is the first sign that the cupcakes will be light as a cloud.
Kitchen Hack: Sift the dry ingredients directly into the bowl of your stand mixer; this saves a bowl and prevents lumps.In a large mixing bowl, cream the ½ cup of softened butter with the granulated sugar until the mixture is pale, fluffy, and smells like fresh‑baked cookies—about 3‑4 minutes on medium speed. The color should change from buttery yellow to a creamy ivory, indicating that air has been incorporated.
Add the eggs one at a time, beating well after each addition. Then stir in the vanilla extract and, if you’re feeling fancy, the almond‑orange liqueur. The batter should become glossy and slightly thickened, a texture that feels like thickened cream when you lift the whisk.
Gradually add the dry ingredient mixture to the butter‑sugar‑egg blend, alternating with the milk. Begin and end with the dry ingredients, mixing on low speed just until combined. Over‑mixing will develop gluten and give you a dense cupcake, so stop when you no longer see flour streaks.
Divide the batter evenly into two bowls. To the first bowl, add the beet juice and a few drops of red food coloring if you want a deeper hue; stir gently until the color is uniform. To the second bowl, fold in the blueberry puree and blue food coloring, again using a figure‑eight motion to keep the batter airy.
Watch Out: Adding too much puree can make the batter too wet, causing the cupcakes to sink. Stick to the measured amount and adjust with a splash of extra flour if needed.Using a large spoon or a piping bag, fill each cupcake liner with a spoonful of red batter, then a spoonful of blue batter, and finish with a final dollop of white batter (plain batter without color). This layering creates a beautiful marble effect once baked. The batter should sit about two‑thirds full; over‑filling leads to overflow and uneven tops.
Slide the tin into the preheated oven and bake for 18‑22 minutes, or until a toothpick inserted into the center comes out clean and the tops have a slight spring. Around the 12‑minute mark, you’ll notice the edges pulling away from the liner—a visual cue that they’re done. Resist the urge to open the oven door early; the sudden temperature drop can cause the cupcakes to collapse.
While the cupcakes cool in the tin for 5 minutes, whip the frosting. Beat the 1 cup of softened butter on medium speed until creamy, then gradually add the powdered sugar, a cup at a time, beating after each addition. Add the heavy cream and vanilla extract, then split the frosting into three bowls. Color one bowl with red food coloring, another with blue, and leave the third pure white for piping stars.
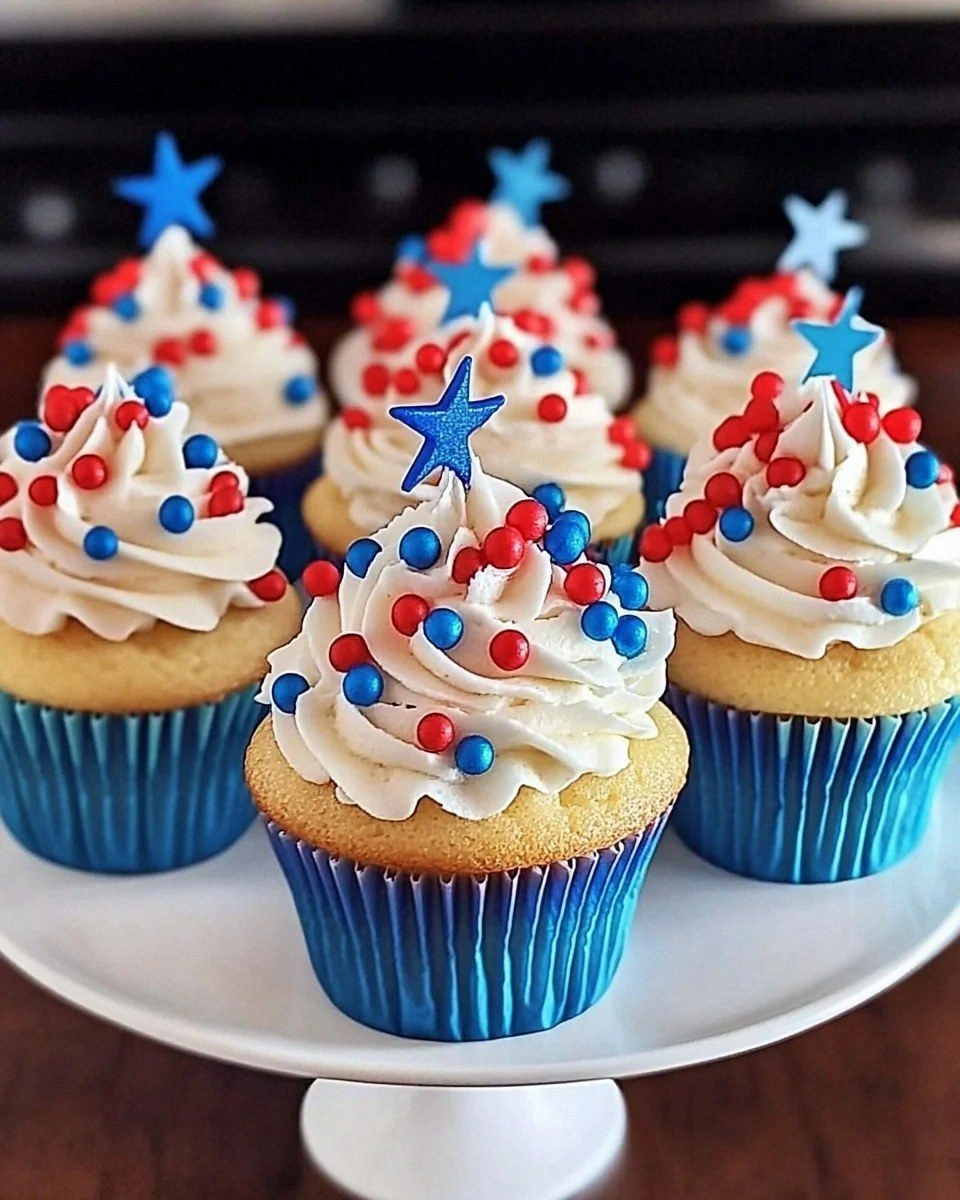
Transfer the cupcakes to a wire rack to cool completely before frosting. This prevents the buttercream from melting. Once cool, pipe swirls of white frosting on top, then drag a toothpick through the swirl to create a “ripple” effect, and finally, pipe small red and blue dots or stripes for a patriotic finish. The frosting should hold its shape but feel soft enough to melt in your mouth.
Step back and admire your creation. That moment when the light catches the glossy frosting and the colors pop? That’s the payoff of every minute you spent perfecting the batter. I dare you to taste this and not go back for seconds—because honestly, I ate half the batch before anyone else got a chance.
Kitchen Hack: Store the frosting in a shallow airtight container; this speeds up the chilling process and keeps it from absorbing fridge odors.
That's it — you did it. But hold on, I've got a few more tricks that'll take this to another level…
Insider Tricks for Flawless Results
The Temperature Rule Nobody Follows
Never, ever bake cupcakes straight out of the fridge. Let the batter sit at room temperature for 10 minutes before filling the liners. The batter’s temperature influences how the leavening reacts; a cold batter can cause a sudden burst of steam that creates uneven domes. I once tried skipping this step—let’s just say the cupcakes looked like deflated balloons.
Why Your Nose Knows Best
When the cupcakes are about 12 minutes into baking, open the oven just enough to sniff. A sweet, buttery aroma that’s beginning to turn nutty signals that the crust is forming. If you smell a faint burnt sugar scent early, lower the oven temperature by 10°F; this subtle adjustment prevents over‑browning.
The 5‑Minute Rest That Changes Everything
After removing the cupcakes from the oven, let them rest in the tin for exactly five minutes before transferring to a wire rack. This short rest allows the steam to finish cooking the interior gently, resulting in a fluffier crumb. Skipping this step often yields a dry top and a gummy bottom.
Frosting Consistency Cheat
If your buttercream looks too thick, add a teaspoon of milk or cream and beat on low speed. The frosting will smooth out without becoming runny. Conversely, if it’s too soft, chill it for 10 minutes, then re‑beat. This temperature control keeps the frosting pipeable and prevents sagging.
Color Boost Without Over‑Dyeing
Natural beet juice and blueberry puree can fade a bit during baking. To intensify the hues, add a pinch of cocoa powder (for deeper red) or a dash of white chocolate melt (for brighter blue) to the colored batter just before piping. The added fats also improve the crumb’s tenderness.
Creative Twists and Variations
This recipe is a playground. Here are some of my favorite ways to switch things up:
Patriotic Peanut Butter
Swap ¼ cup of the butter in the cake for creamy peanut butter. The nutty undertone pairs surprisingly well with the fruit‑infused colors, and you can pipe a thin line of chocolate ganache for a “chocolate‑covered flag” look.
Spiced Holiday Version
Add a pinch of ground cinnamon and nutmeg to the batter for a warm, autumnal twist. Pair with a maple‑infused frosting and you’ve got a cupcake that works for Thanksgiving as well as the Fourth of July.
Vegan Friendly
Replace butter with coconut oil, use aquafaba (the liquid from a can of chickpeas) in place of eggs, and swap dairy milk for almond milk. The texture remains moist, and the colors stay vibrant thanks to the natural juices.
Gluten‑Free Glory
Use a 1:1 gluten‑free flour blend, and add a tablespoon of xanthan gum to mimic the elasticity of gluten. The cupcakes will rise just as high, and the crumb stays tender.
Miniature Flag Cupcakes
Use a mini muffin tin and pipe the frosting into tiny star shapes. These bite‑size versions are perfect for cocktail parties or as a garnish for a dessert platter.
Storing and Bringing It Back to Life
Fridge Storage
Place the cooled cupcakes in an airtight container and store them in the refrigerator for up to three days. The frosting will firm up slightly, making them easier to transport. Before serving, let them sit at room temperature for 20 minutes so the buttercream softens.
Freezer Friendly
Wrap each cupcake individually in plastic wrap, then place them in a freezer‑safe bag. They’ll keep for up to one month. To reheat, remove the wrap, place the cupcakes on a parchment‑lined tray, and microwave for 15‑20 seconds; the interior will be warm and the frosting will regain its creamy texture.
Best Reheating Method
When you want to serve them fresh from the freezer, preheat your oven to 300°F (150°C), arrange the cupcakes on a baking sheet, and add a tiny splash of water (about a teaspoon) to the bottom of the tray. Cover loosely with foil and heat for 8‑10 minutes. The steam created by the water brings the crumb back to life without drying it out.