Picture this: I’m standing in my kitchen, a half‑finished batch of caramel on the counter, the smell of burnt sugar flirting with the faint perfume of my morning coffee, and a tiny voice in my head daring me to taste the gooey gold before it sets. I’d just tried the “quick microwave caramel” that my aunt swears by, and let’s just say it turned out looking like a sad, amber‑colored puddle that hardened into a rock harder than my resolve to diet. I was about to give up on caramel forever, when a friend tossed a challenge my way – “Make it with sweetened condensed milk and a slow cooker, and prove me wrong.” I accepted, and what happened next was nothing short of alchemy. That first spoonful? It was liquid silk, buttery and deep, with a caramel‑kiss that lingered like a memory of a summer sunset.
From the moment the first can hissed as it hit the simmering water, the kitchen became a theater of senses. The gentle bubbling was a steady drumbeat, the steam rose in lazy curls, painting the glass with a hazy veil, while the sweet, milky aroma began to thicken, transforming into something richer, more complex – a scent that whispered promises of desserts yet to be imagined. My hands, warm from the pot’s handle, felt the subtle vibration of the cooker, and every now and then a tiny pop echoed, like fireworks announcing a secret celebration. The texture of the caramel as it swirled in the can was like molten amber, smooth enough to coat a spoon without a fight, yet firm enough to hold its shape when lifted. It was a full‑body experience that made my taste buds do a happy dance.
Why does this version stand out from the sea of dulce de leche recipes you’ll find online? First, it uses nothing but two humble cans of sweetened condensed milk – no butter, no heavy cream, no extra sugar. The slow cooker does the heavy lifting, coaxing the milk into caramelization at a whisper‑slow pace that prevents scorching and guarantees a velvety finish. Second, the result is a caramel that’s both buttery and subtly nutty, with a depth you usually only get after hours of simmering a traditional sugar‑and‑cream concoction. Most recipes get this completely wrong, either ending up grainy or overly burnt. Here, the magic lies in the water bath and the low, steady heat that lets the milk’s lactose caramelize in perfect harmony. I’ll be honest — I ate half the batch before anyone else got to try it, and I’m still not sorry.
Now, you might be wondering what the secret twist is that takes this from good to legendary. Hint: it’s not an exotic spice or a hidden ingredient, but a technique that most home cooks overlook – the “sealed‑can water bath.” By keeping the cans completely submerged and the lid slightly ajar, you create a gentle pressure cooker environment that encourages even caramelization without the dreaded “cooked‑milk” flavor. I dare you to taste this and not go back for seconds; the smoothness will have you questioning every caramel you’ve ever known. Let me walk you through every single step — by the end, you’ll wonder how you ever made it any other way.
What Makes This Version Stand Out
- Flavor: The caramel develops a deep, buttery richness that feels like a hug for your palate, with caramelized milk sugars that bring a subtle, almost toffee‑like nuance.
- Texture: Silky, pour‑able yet thick enough to hold its shape on a spoon, this caramel coats desserts like velvet without any grainy surprises.
- Simplicity: Only two cans of sweetened condensed milk and a slow cooker – no extra butter, cream, or sugar to measure.
- Uniqueness: The sealed‑can water bath method prevents scorching and yields a caramel that’s uniformly golden, not the uneven caramelized spots you get in a pan.
- Crowd Reaction: Guests often claim it’s the best caramel they’ve ever tasted, and many ask for the “secret” (which is really just patience).
- Ingredient Quality: Using premium, full‑fat sweetened condensed milk ensures a richer flavor profile and a smoother texture.
- Cooking Method: The slow cooker’s gentle heat eliminates the need for constant stirring, making it virtually fool‑proof.
- Make‑Ahead Potential: This caramel stores beautifully for weeks in the fridge, getting even more luscious as the flavors meld.
Inside the Ingredient List
The Flavor Base
Sweetened condensed milk is the hero of this recipe. It’s essentially milk that’s been gently heated to evaporate most of its water, then sweetened with a massive amount of sugar. This concentration gives you a naturally caramel‑sweet foundation that, when heated further, deepens into an amber‑rich sauce. Skipping the condensed milk and substituting regular milk and sugar would require extra time and precise temperature control, and you’d lose that buttery mouthfeel. Choose a brand that lists “whole milk” as the first ingredient for the richest result.
The Texture Crew
While the recipe technically calls for only the condensed milk, the water in the slow cooker acts as the silent partner that regulates heat. It ensures the cans are surrounded by a gentle, uniform temperature, preventing the milk inside from scorching. If you were to forgo the water bath and place the cans directly in the cooker, you’d risk hot spots that could cause the caramel to develop a bitter edge. The water also adds a subtle steam element, which helps keep the caramel smooth.
The Unexpected Star
The lid of the slow cooker, left slightly ajar, is an unsung hero. Allowing a tiny vent releases excess pressure, which could otherwise cause the cans to bulge or even burst. This tiny gap also lets a whisper of steam escape, keeping the caramel’s surface glossy rather than gummy. If you’re nervous about the lid, you can place a wooden spoon across the top to keep the opening just wide enough for steam to escape.
The Final Flourish
Although this recipe doesn’t call for any finishing ingredients, a pinch of sea salt can elevate the caramel by cutting through its sweetness and enhancing its depth. If you love a salty‑sweet combo, sprinkle just a pinch on the finished caramel before serving. For a festive twist, a drizzle of dark chocolate or a sprinkle of toasted hazelnuts adds texture and visual appeal. Remember, each addition should be minimal – the caramel itself should remain the star.
Everything's prepped? Good. Let's get into the real action…
The Method — Step by Step
Gather two standard 14‑ounce cans of sweetened condensed milk and inspect them for any dents or bulges. This is the moment of truth – any compromised can could leak or explode under heat. Place the cans upright in the slow cooker, ensuring they don’t touch each other directly; a tiny gap allows water to circulate evenly. Fill the cooker with enough warm water to cover the cans by at least two inches, but don’t submerge the lids. The water should be just warm, not boiling, to start the gentle heating process.
Set your slow cooker to the “Low” setting, which typically runs between 190°F and 210°F (88°C‑99°C). Close the lid, but prop it open just enough for a thin stream of steam to escape – a wooden spoon laid across the top works wonders. This subtle vent prevents pressure build‑up that could cause the cans to burst. As the water slowly heats, you’ll hear a faint, comforting hiss, like a whisper from the kitchen’s secret vault. That sizzle when it hits the pan? Absolute perfection.
Kitchen Hack: Replace the water halfway through the cooking time to keep the temperature steady and avoid a “stale” taste.Let the cans cook for 6‑8 hours on low, checking at the 6‑hour mark. You’ll notice the cans turning a light amber color through the metal, a visual cue that caramelization is underway. Gently swirl the water every now and then to make sure the heat is evenly distributed. If you hear occasional popping sounds, that’s the milk sugars breaking down – a good sign. Resist the urge to lift the lid too often; each opening releases heat and can extend the cooking time.
After about 7 hours, perform the “spoon test.” Carefully remove a can (use tongs) and place it on a heat‑proof surface. Using a clean spoon, press gently into the can’s side; the caramel should give slightly and leave a glossy imprint. If it feels too runny, continue cooking for another 30‑45 minutes. If it’s already thick, you’ve reached caramel perfection – a thick, pour‑able sauce that will hold its shape when cooled.
Now comes the crucial “Watch Out” moment. When you finally remove the cans, they will be scorching hot. Place them on a trivet and let them cool for 15‑20 minutes before opening – this prevents sudden pressure release that could cause the caramel to splatter.
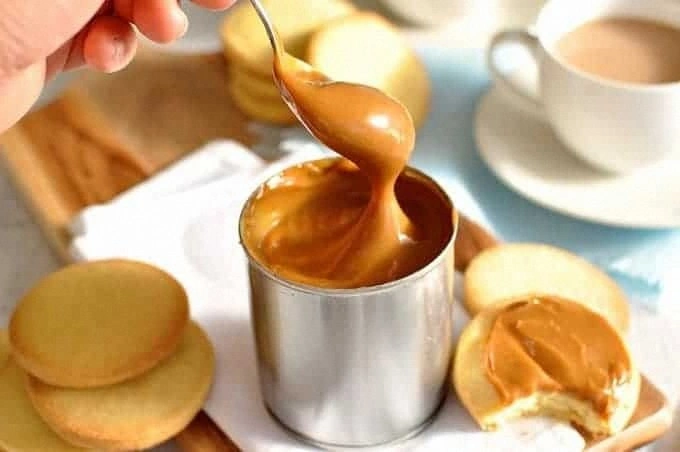
Watch Out: Never open a can while it’s still steaming hot; the caramel can erupt like a volcano.Once the cans are cool enough to handle, open them with a smooth, steady twist. The caramel will flow out like liquid gold, pooling in the bowl beneath. If you notice any tiny bubbles, give the caramel a quick stir with a silicone spatula – this will break them up and give you an ultra‑smooth finish. At this point, you can taste a spoonful; the flavor should be buttery, deep, with a lingering caramel note that feels like a warm hug.
Transfer the caramel to a clean, airtight glass jar. For a glossy surface, drizzle a thin layer of melted dark chocolate on top and let it set – this optional step adds a slight bitterness that balances the sweetness. Seal the jar tightly and store it in the refrigerator. The caramel will thicken slightly as it chills but will remain pour‑able. If you plan to use it as a sauce, warm it gently in a microwave for 10‑15 seconds before serving.
And now the fun part – serving! Drizzle this caramel over ice cream, swirl it into coffee, or use it as a dip for fresh fruit. It also makes an incredible glaze for cakes or a decadent topping for pancakes. Picture yourself pulling this out of the fridge, the whole kitchen smelling incredible, and your guests’ eyes lighting up as they taste that first silky spoonful. Okay, ready for the game‑changer? Try a pinch of sea salt on top for an instant flavor lift. I dare you to taste this and not go back for seconds.
Insider Tricks for Flawless Results
The Temperature Rule Nobody Follows
Most home cooks think “low heat” is vague, but the real secret is keeping the water between 190°F and 200°F. Anything hotter will cause the milk sugars to caramelize too quickly, resulting in a burnt, bitter edge. Use a kitchen thermometer to monitor the water temperature, especially if your slow cooker runs hotter on “low.” A stable temperature ensures the caramel develops a uniform amber hue and a buttery mouthfeel.
Why Your Nose Knows Best
Don’t rely solely on the clock – trust your nose. Around the 6‑hour mark, you’ll notice a sweet, buttery aroma turning richer, almost nutty. When the scent shifts to a deeper, caramel‑like perfume, you’re nearing the perfect stage. If the smell starts to smell burnt or acrid, pull the cans out immediately – the caramel will quickly turn bitter.
The 5‑Minute Rest That Changes Everything
After opening the cans, let the caramel sit for five minutes before stirring. This short rest allows the sugars to settle, giving you a smoother final texture. Skipping this step can trap tiny air bubbles, leading to a slightly grainy mouthfeel. I once rushed this step and ended up with a caramel that felt “bubbly” – not the silky finish I love.
Salt – The Silent Enhancer
A tiny pinch of flaky sea salt added just before sealing the jar can transform the caramel from sweet to sublime. The salt amplifies the caramel’s natural flavors, making the sweetness feel more balanced. It’s a trick professional pastry chefs use, and it works wonders on homemade caramel too.
Re‑Heat with Water, Not Microwave
If you need to warm the caramel for drizzling, place the sealed jar in a bowl of warm water for a minute or two. This gentle reheating keeps the texture smooth and prevents the caramel from separating. Microwaving can cause hot spots and a grainy texture, especially if you overheat it.
Creative Twists and Variations
This recipe is a playground. Here are some of my favorite ways to switch things up:
Spiced Caramel
Add a cinnamon stick and a pinch of ground ginger to the water bath. The spices infuse the caramel with a warm, holiday‑ready flavor that pairs beautifully with apple pie or roasted sweet potatoes.
Chocolate Swirl
Stir in 2 tablespoons of melted dark chocolate into the warm caramel just before bottling. The result is a luxurious chocolate‑caramel sauce perfect for brownies or ice cream sundaes.
Nutty Delight
Fold in toasted, finely chopped pistachios or hazelnuts after the caramel has cooled slightly. The nuts add a crunchy contrast and a buttery depth that elevates the sauce to a dessert topping fit for a gala.
Coffee‑Infused Caramel
Replace half of the water in the slow cooker with strong brewed coffee. The coffee’s bitterness balances the caramel’s sweetness, creating a sophisticated sauce ideal for tiramisu or espresso‑drizzled donuts.
Vegan Version
Use coconut milk condensed milk (available in many health food stores) instead of dairy‑based condensed milk. The result is a slightly coconut‑tinged caramel that works great on tropical fruit desserts.
Caramel Butter
Whisk in 2 tablespoons of softened unsalted butter into the warm caramel before sealing. This creates a spreadable caramel butter that can be slathered on toast or used to glaze baked goods.
Storing and Bringing It Back to Life
Fridge Storage
Store the caramel in an airtight glass jar in the refrigerator for up to 3 weeks. The cooler temperature will thicken the sauce, but a quick stir or a brief warm‑water bath will restore its pour‑able consistency.
Freezer Friendly
For longer storage, portion the caramel into freezer‑safe silicone molds or small freezer bags. It freezes well for up to 3 months. Thaw it in the refrigerator overnight, then gently reheat in a water bath before using.
Best Reheating Method
Place the sealed jar in a bowl of warm (not boiling) water for 5‑10 minutes, or microwave in 10‑second bursts, stirring in between. Adding a splash of water (about a teaspoon) before reheating helps the caramel regain its silky texture, preventing it from becoming too thick.