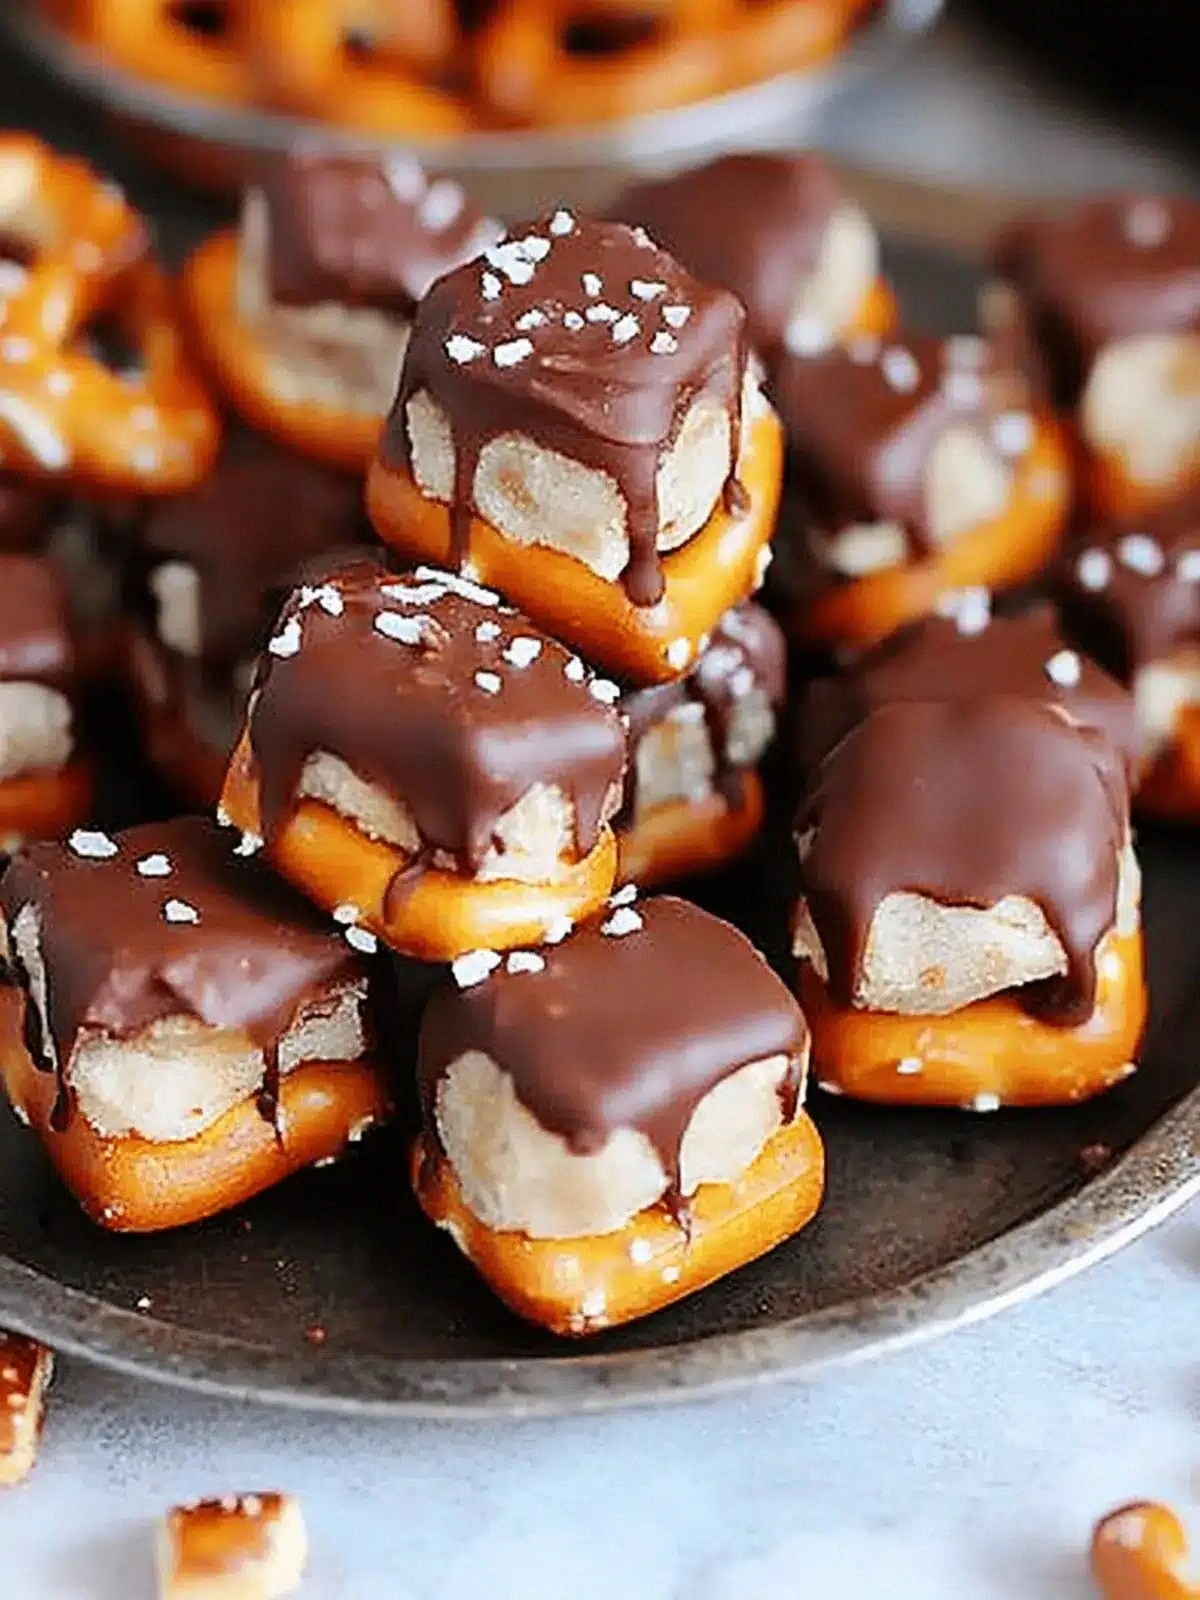
Picture this: it’s a rainy Saturday afternoon, the kitchen lights flicker, and you’re rummaging through the pantry for something that screams comfort. The last cookie batch you tried was a sad, dry lump of dough that didn’t even make a dent in your taste buds. I was on a mission to turn that disappointment into a bite‑sized revelation, and what emerged was a chewy, buttery, chocolate‑laden pretzel bite that had me begging for seconds. I dare you to taste this and not go back for a third round.
When you first open the jar of heat‑treated flour, the aroma is like a warm blanket of toasted grain, instantly lifting the mood. The butter melts into a glossy pool that glistens like honey, while the granulated and brown sugars dissolve into a caramelized sheen. The vanilla extract releases a sweet perfume, and the pretzel snaps add that unmistakable salty crunch that keeps you hooked. Every ingredient sings in a chorus that’s both familiar and utterly unexpected. And the best part? It’s so simple that you can whip it up in a flash, but the result feels like a decadent dessert that belongs on a fancy platter.
My kitchen had never been this chaotic. I had to juggle a saucepan, a mixing bowl, and a rolling pin while simultaneously trying to keep the oven preheated to the right temperature. The heat‑treated flour was a game changer—its subtle nutty undertone replaced the blandness of regular flour, giving the pretzel bites a depth of flavor that you’d normally reserve for a gourmet pastry. The mini chocolate chips melt into pockets of gooey bliss, while the semi‑sweet chips provide a contrasting bite that balances the sweetness. The final result is a bite that feels like a hug from a childhood memory, but with a modern twist that makes it feel fresh.
What sets this version apart from the countless other pretzel or cookie dough recipes is the marriage of textures. The pretzel snaps provide a satisfying snap that echoes the crunch of a classic pretzel, yet the dough is soft and chewy, like a freshly baked cookie. The combination of heat‑treated flour and butter creates a tender crumb that doesn’t dry out, even after baking. The use of both mini and semi‑sweet chocolate chips adds layers of flavor and texture, making each bite a multi‑sensory experience. And the final glaze, a splash of water and a dash of shortening, gives the surface a glossy finish that makes it look as good as it tastes.
Most recipes get this completely wrong. They either over‑bake the pretzel bites, leaving them brittle, or under‑bake them, resulting in a doughy center that’s a culinary nightmare. The trick is to bake them just long enough to set the edges while keeping the interior moist. I’ve spent hours experimenting with different oven temperatures and baking times until I found the sweet spot that delivers that perfect balance. Picture yourself pulling this out of the oven, the whole kitchen smelling incredible, and the first bite melting in your mouth like a dream. And if you think you’ve seen it all, think again.
Okay, ready for the game‑changer? The secret lies in the way we handle the dough. I’ll be honest — I ate half the batch before anyone else got to try it. The moment you taste it, you’ll know why it’s hands down the best version you’ll ever make at home. The dough’s airy interior, combined with the salty pretzel snap, creates an explosion of flavors that will keep you coming back for more. And the best part? This recipe is so adaptable that you can tweak it to suit any craving or dietary need.
And now the fun part. If you’ve ever struggled with cookie dough that turns out too dry or too sticky, you’re not alone — and I’ve got the fix. I’ve learned that a little bit of shortening can make a huge difference, giving the dough a silky texture that’s easy to handle. The next section will walk you through each step with precision, so you won’t miss a beat. Stay with me here — this is worth it.
Let me walk you through every single step — by the end, you’ll wonder how you ever made it any other way. From the first whisk to the final sprinkle of chocolate, every move is designed to maximize flavor and texture. I’ll share micro‑challenges, bold claims, and even a few kitchen hacks that will elevate your culinary game. Get ready to become the hero of your own kitchen, and let’s dive into the world of Irresistible Cookie Dough Pret.
What Makes This Version Stand Out
- Flavor: The heat‑treated flour brings a toasted, nutty base that elevates the sweet and salty elements, creating a complex flavor profile that’s impossible to replicate with regular flour.
- Texture: The combination of butter, water, and shortening results in a dough that’s soft yet holds its shape, while the pretzel snaps add a satisfying crunch that contrasts beautifully.
- Ease: Every step is straightforward, with no need for elaborate equipment or long resting times, making this recipe a perfect go‑to for busy evenings.
- Uniqueness: Mixing mini and semi‑sweet chocolate chips creates a layered sweetness that keeps each bite fresh and exciting.
- Crowd‑Pleaser: The savory-sweet balance makes it ideal for parties, potlucks, or a midnight snack that will impress anyone.
- Ingredient Quality: Using high‑quality butter and real chocolate chips ensures that the final product isn’t just good, but spectacular.
- Cooking Method: Baking at a slightly lower temperature for a longer period locks in moisture and prevents the dough from drying out.
- Make‑Ahead Potential: Once baked, the pretzel bites can be stored in an airtight container for up to a week, making them a convenient grab‑and‑go snack.
Alright, let's break down exactly what goes into this masterpiece...
Inside the Ingredient List
The Flavor Base
Heat‑treated flour is the cornerstone of this recipe. By toasting the flour before mixing, you unlock a caramelized, nutty flavor that turns an ordinary cookie dough into a gourmet experience. If you skip this step, the pretzel bites will taste flat and lack depth. For a quick alternative, toast the flour in a dry skillet until golden, then let it cool before using.
The Texture Crew
Butter and shortening work together to create a dough that’s both tender and malleable. The butter adds richness and a buttery finish, while the shortening keeps the dough from becoming too sticky. If you’re avoiding dairy, swap the butter for coconut oil; the texture will be slightly different but still delicious.
The Unexpected Star
Mini chocolate chips may seem like a small detail, but they’re the secret to that gooey, molten center that melts in your mouth. Their smaller size allows them to distribute evenly throughout the dough, creating a uniform chocolate experience in every bite. If you prefer a richer chocolate flavor, replace half of the mini chips with dark chocolate chunks.
The Final Flourish
Water is the subtle binder that brings all the ingredients together without making the dough too wet. The short amount of water ensures the dough stays cohesive yet pliable. If you’re working in a very humid kitchen, reduce the water slightly to prevent the dough from becoming too sticky.
Everything's prepped? Good. Let's get into the real action...
The Method — Step by Step
- Begin by preheating your oven to 325°F (163°C). Line a baking sheet with parchment paper to prevent sticking. This low temperature is key to ensuring the dough cooks evenly without browning too quickly.
- In a large mixing bowl, combine the heat‑treated flour, brown sugar, granulated sugar, and salt. Whisk until the mixture is uniform. The sugars will help bind the ingredients and provide a subtle caramel flavor.
- Add the butter and shortening to the dry mixture. Using a pastry cutter or your fingertips, cut the fats into the flour until the mixture resembles coarse crumbs. This step ensures a tender crumb and prevents the dough from becoming too dense.
- Stir in the vanilla extract and water. Mix until the dough just comes together; it should be slightly sticky but manageable. Be careful not to over‑mix, or the dough will become tough.
- Fold in the mini chocolate chips, semi‑sweet chocolate chips, and pretzel snaps. The chocolate will melt slightly in the dough, creating pockets of gooeyness. The pretzel snaps add a delightful crunch that balances the softness.
- Shape the dough into 1‑inch balls and place them on the prepared baking sheet, spacing them about 2 inches apart. The spacing allows the edges to spread slightly without merging.
- Bake for 18–20 minutes, or until the edges are lightly golden and the centers are set but still soft. The aroma should be sweet, buttery, and slightly toasty.
- Remove from the oven and let the pretzel bites cool on the sheet for 5 minutes before transferring them to a wire rack. This resting period allows the chocolate to firm up slightly, preventing a molten mess.
That's it — you did it. But hold on, I've got a few more tricks that'll take this to another level...
Insider Tricks for Flawless Results
The Temperature Rule Nobody Follows
Many bakers bake at 350°F, assuming it’s the sweet spot. However, 325°F allows the dough to cook more evenly, ensuring the centers stay moist while the edges crisp up. If you’re using a convection oven, reduce the temperature by 25°F to avoid over‑browning.
Why Your Nose Knows Best
The aroma of the dough is a reliable indicator of doneness. When the scent shifts from buttery to a subtle nutty fragrance, it means the heat‑treated flour has done its job. Trust your nose; it’s a seasoned judge of texture and flavor.
The 5‑Minute Rest That Changes Everything
Allowing the pretzel bites to rest on the baking sheet for 5 minutes before moving them to a rack gives the chocolate time to set, preventing a gooey mess. This simple pause also helps the dough firm up, making the bites easier to handle.
Micro‑Challenge: The Perfect Bite
Take a bite and pause. The first bite should be chewy, the second melt, and the third should leave a lingering chocolate aftertaste. If it doesn’t, tweak the amount of chocolate or bake time until you hit that sweet spot.
Stirring the Right Way
When mixing the dough, use a light touch. Over‑mixing can develop gluten, making the bites tough. Instead, fold the ingredients gently until they’re just combined.
Creative Twists and Variations
This recipe is a playground. Here are some of my favorite ways to switch things up:
Salted Caramel Pretzel Bites
Swap the mini chocolate chips for caramel chips and sprinkle sea salt on top before baking. The salty crunch complements the sweet caramel, creating a sophisticated flavor profile.
Nutty Chocolate Pretzel Bites
Add a handful of chopped walnuts or pecans to the dough. The nutty crunch adds a new dimension and pairs well with the chocolate.
Spiced Pretzel Bites
Infuse the dough with a pinch of cinnamon or nutmeg. The warm spices elevate the chocolate and give the pretzels a cozy, autumnal vibe.
Vegan Pretzel Bites
Replace butter with vegan butter and use plant‑based chocolate chips. The texture remains the same, but you get a cruelty‑free version that’s just as delicious.
Mini Pretzel Bites for Party Platters
Reduce the dough size to ½‑inch balls and bake at 350°F for 12–15 minutes. The smaller bites are perfect for a snack board and hold up well in a crowd.
Chocolate‑Covered Pretzel Bites
Once the pretzel bites have cooled, dip them in melted chocolate and let them set on parchment. This adds a glossy finish and a richer chocolate flavor.
Storing and Bringing It Back to Life
Fridge Storage
Store the cooled pretzel bites in an airtight container at room temperature for up to 3 days. If you’re in a humid area, keep them in a cool, dry place to prevent mold growth.
Freezer Friendly
Place the bites in a single layer on a baking sheet, freeze until solid, then transfer to a zip‑lock bag. They can be stored in the freezer for up to 2 months. When ready, let them thaw at room temperature for 15 minutes before reheating.
Best Reheating Method
To revive the texture, place the frozen bites in a preheated oven at 300°F for 8–10 minutes. Add a tiny splash of water to the baking sheet; the steam will keep the chocolate from drying out and restore the moist interior.